You can insert already uploaded files or upload new files directly when editing an article.
Inserting a file
Drag-and-drop method
You can upload a new file when you edit a page:
- Drag the file onto the page. A horizontal line will appear where the file will be dropped
- Change the file name in the Upload file dialog (optional)
- Assign a categorie (optional)
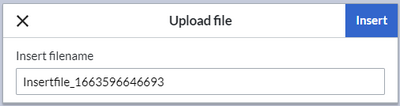
Insert file via drag-and-drop - Click Insert.
- Double-click the thumbnail to adjust the size and positioning (optional).

Editor toolbar
To upload and insert a file from the editor toolbar:
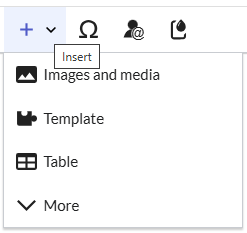
- Select Insert > Images and Media from the editor toolbar.
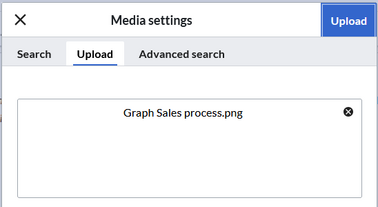
Insert Media dialog - Switch to the Upload tab (2) in the Media settings dialog to upload a new file.
To select an existing file, switch to the Advanced search tab (3). The Search tab (1) shows the latest uploaded files for selection.
Media settings - Click Select a file. Provide a Target namespace (optional). If you are unsure, leave the namespace setting as suggested.
- Click Upload. The dialog window Media Settings opens.
Upload file dialog


Now click "Upload":
The general and advanced settings are largely identical to image files. However, there are differences in the linking options, as, for example, a PDF file is not displayed as an image directly on the page.
Special features when including files

There are three ways to link a file on a page:
- Link this file (1): The inserted link opens the file.
- Link file description page (2): The link leads to the file page on the wiki. There, you can view the file details or upload a new version of the file.
- Embed this file (3): The link inserts a preview image. The preview image opens the file description page when clicked. This only works with PDF and .tiff files.
General Settings: An alternative text is required if you embed the file on the page. This is done via the corresponding "Embed this file" button. Since a preview image is created here, the alternative text should be used just like with images.
If you link to the file or the file description page, VisualEditor will in both cases inserts the same link text, even though the link will lead to different pages. However, the displayed link text can be changed directly on the page. Just click into the text and change it accordingly.
Maximum file size
The maximum allowed file size cannot be configured in the wiki itself. The maximum allowed limit is defined on the server in the php.ini file in the PHP installation. The actual (possibly smaller) limit, however, is set in the BlueSpice installation in LocalSettings.php or another configuration file in the settings.d folder. The default setting is 32 MB.
Contact your wiki administrator if you receive an error message when trying to upload a larger file.
Avoiding unusual file names
Allowed file types
If you get an error message during the file upload, the file type might not be allowed. Allowed file types are set by an admin user in the Config Manager.