No edit summary Tag: 2017 source edit |
No edit summary Tag: 2017 source edit |
||
| Line 5: | Line 5: | ||
<gallery widths="250" heights="350"> | <gallery widths="250" heights="350"> | ||
File:Manual:main nav 4-4.png|Main navigation | File:Manual:main nav 4-4.png|Main navigation BlueSpice 4.4+ | ||
File:Manual:skin-discovery-hauptnavigation-EN.png|Main navigation | File:Manual:skin-discovery-hauptnavigation-EN.png|Main navigation BlueSpice -4.3 | ||
</gallery> | </gallery> | ||
Revision as of 12:25, 13 December 2023
Overview
By default, some links are provided as entry points to the wiki. Wiki administrators can deactivate these links in the configuration manager if needed. In addition, you can also add new links below the entrypoints (admin permissions required). Please note that no hierarchical links can be created. Therefore, it makes sense to mainly set up links to the most important topics and to portal pages that contain additional links or page lists.
-
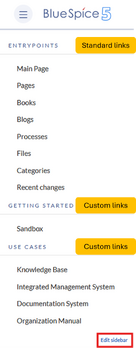
Main navigation BlueSpice 4.4+
-
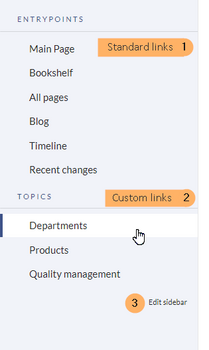
Main navigation BlueSpice -4.3
To open the menu editor:
- Click Edit sidebar at the bottom of the navigation menu. If the page does not exist yet, you will see a notice on the page.
Menu editor
To add a new menu header using the menu editor:
- Click Add new element to create a new menu header.

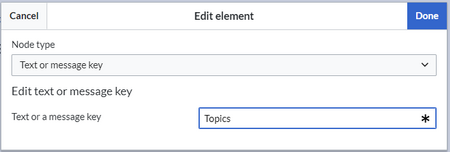
Add a new menu heading - Enter the text for your menu header. In a multilingual wiki, you can also enter a message key.

Enter a heading name - Click Done.
To add links:
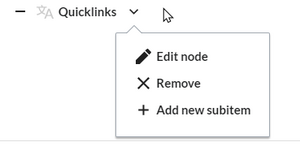
- Select Add new subitem from the dropdown menu of the menu header.

add a link as a new subitem - Enter the page name as the link target and the label that you want to show:

enter link info - Click Done.
- Repeat steps 1-3.
- Click Save changes.
Source edit mode
To add new links:
- Change to source editing mode.
- Create one or more navigation links (with or without section heading). The following example shows a link to the page "Company" with the label "Our company" and an external link to the BlueSpice website with the label "Website". The links are grouped together under the section heading "Quicklinks":
*Quicklinks
**Company|Our company
**https//www.bluespice.com/de|Website
- Save the page. The links are now shown in the main navigation.
Link labels may collide with system messages. If this is the case, simply append the HTML-code for an empty space to the description:
**Portal|Portal 
Deactivating standard links
The standard links can be deactivated in the configuration manager. The following settings are available under Feature > Skinning:
BlueSpiceBookshelf:
- Show entrypoint "Bookshelf"
BlueSpiceDiscovery:
- Show entrypoint "Mainpage"
- Show entrypoint "All pages"
- Show entrypoint "Recent changes"
BlueSpiceSocial:
- Show entrypoint "Timeline"
BlueSpiceSocialBlog:
- Show entrypoint "Blog"
It is possible to show navigation elements for specific user groups only. Please note that the pipe symbol (|) between the page name and its label has to be escaped as {{!}} within this function.
This syntax is defined in the extension UserFunctions.
{{#ifingroup:sysop,widgeteditor |
*Test2
**somepage{{!}}Some page
|}}
Additional customizations
- Alignment for navigation with long link labels
- Display icons with navigation links
- Multi-language navigation

