No edit summary |
No edit summary |
||
| Line 2: | Line 2: | ||
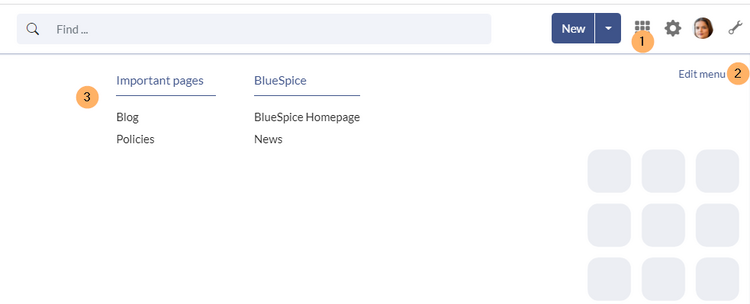
In BlueSpice 4, an additional custom menu is integrated as a mega menu. This menu can be created and edited by users with admin rights. The link-icon (1) is only displayed once the corresponding page has been created. | In BlueSpice 4, an additional custom menu is integrated as a mega menu. This menu can be created and edited by users with admin rights. The link-icon (1) is only displayed once the corresponding page has been created. | ||
[[File:Manual:customMenu-view-EN.png|alt=Custom menu screenshot|center|thumb|750x750px|Custom menu: (1) open menu, (2) edit link, (3) menu items]] | [[File:Manual:customMenu-view-EN.png|alt=Custom menu screenshot|center|thumb|750x750px|Custom menu: (1) open menu, (2) edit link, (3) menu items]] | ||
==Visual edit mode== | |||
a{{BSVersion|bsvFrom=4.2|bsvTo=|bsvFeature=Visual menu editor}} | |||
'''Click''' ''Edit menu'' (2) to switch to edit mode. | |||
'''To | If you are just starting out with the custom menu, you can start by editing the default ''Nav Menu'' item. | ||
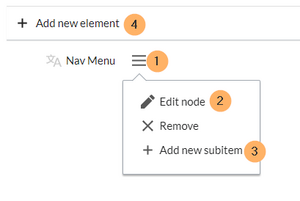
#''' | [[File:BlueSpiceCustomMenu navmenu item.png|alt=editing interface|center|thumb|'''editing interface:''' menu header (1), edit header name (2), add link to heading (3), add new menu header (4)]] | ||
'''To edit the NavMenu item:''' | |||
#'''Click''' the icon for opening the edit dialog. (1) | |||
#'''Click''' ''Edit Node.'' | |||
#'''Enter''' the text for your menu header. In a multilingual wiki, you can also enter a [[mediawikiwiki:Help:System_message|message key]]. | |||
{{#dpl: title=Manual:Extension/BlueSpiceDiscovery/Main_navigation|include=menulinks}} | |||
== <span class="mw-headline">Adding links in source editing mode</span> == | |||
'''To create a menu header:''' | |||
#'''Create''' the first menu header. Menu headers are marked with a single asterisk (*);<syntaxhighlight lang="text"> | #'''Create''' the first menu header. Menu headers are marked with a single asterisk (*);<syntaxhighlight lang="text"> | ||
* Important pages | * Important pages | ||
Revision as of 14:53, 19 January 2023
In BlueSpice 4, an additional custom menu is integrated as a mega menu. This menu can be created and edited by users with admin rights. The link-icon (1) is only displayed once the corresponding page has been created.

Visual edit mode
a
Click Edit menu (2) to switch to edit mode.
If you are just starting out with the custom menu, you can start by editing the default Nav Menu item.

To edit the NavMenu item:
- Click the icon for opening the edit dialog. (1)
- Click Edit Node.
- Enter the text for your menu header. In a multilingual wiki, you can also enter a message key.
Adding links in source editing mode
To create a menu header:
- Create the first menu header. Menu headers are marked with a single asterisk (*);
* Important pages
- Add the links for this menu header. Links are marked with two asterisks (**) and have the following syntax:
** target page|label
Example:
* Important pages
** Special:Blog|Blog
** IMS:Policies|Policies
* BlueSpice
** https://bluespice.com|BlueSpice Homepage
** https://bluespice.com/category/news-know-how|News
After the custom menu has been created, it can now be modified directly via the Edit menu link (see screenshot above).
To remove the custom menu link-icon from the wiki, the MediaWiki:CustomMenu/Header page must be deleted. The page can be restored via the deletion log.