No edit summary |
No edit summary |
||
| (5 intermediate revisions by the same user not shown) | |||
| Line 1: | Line 1: | ||
==Insert a table== | ==Insert a table== | ||
In VisualEditor, choose "Insert > Tables" to insert a table in a page: | In VisualEditor, choose "Insert > Tables" to insert a table in a page: | ||
[[File:Manual:Ve insert.png|alt=open "insert" menu of the visual editor|center|thumb|180x180px|"Insert"-action]] | |||
[[File: | |||
After entering the rows and columns, an empty table appears with the edit menu: | After entering the rows and columns, an empty table appears with the edit menu: | ||
[[File:table_1.0.png|alt=an empty table with 6 columns and 5 rows with an open inspector menu|center|350x350px|inserted table with table inspector menu]] | |||
[[File: | |||
When the mouse rests on a symbol, the respective function is displayed. | When the mouse rests on a symbol, the respective function is displayed. | ||
Double-click in the cells to insert text: | Double-click in the cells to insert text: | ||
[[File:weekly.png|alt=table with four columns wor Times and days of the week with a time schedule|center|350x350px| | |||
[[File:weekly.png| | {| class="wikitable" | ||
|+ | |||
! style="" | | |||
! style="" | | |||
! style="" | | |||
! style="" | | |||
|- | |||
| style="" | | |||
| style="" | | |||
| style="" | | |||
| style="" | | |||
|- | |||
| style="" | | |||
| style="" | | |||
| style="" | | |||
| style="" | | |||
|- | |||
| style="" | | |||
| style="" | | |||
| style="" | | |||
| style="" | | |||
|- | |||
| style="" | | |||
| style="" | | |||
| style="" | | |||
| style="" | | |||
|- | |||
| style="" | | |||
| style="" | | |||
| style="" | | |||
| style="" | | |||
|} | |||
table in edit mode]] | |||
==Merge rows and columns== | ==Merge rows and columns== | ||
To merge a row or column, select the cells in a row or in a column. The inspector will show a "Merge" button. Click it to merge the cells. The same button is called "Unmerge" if you want to separate connected cells. | |||
[[File:table_3.0.png|alt=Table with all cells in a table row selected and the merge button|center|thumb|350x350px|Merging cells]] | |||
<br /> | |||
==Table properties== | ==Table properties== | ||
In the menu item Properties, there are numerous settings to adjust the functionality and presentation of the table: | In the menu item Properties, there are numerous settings to adjust the functionality and presentation of the table: | ||
{| class="contenttable-blue content table-blue" style="" | {| class="contenttable-blue content table-blue" style="" | ||
!Property | ! style="" |Property | ||
!Description | ! style="" |Description | ||
|- | |- | ||
| | | style="" |Table width | ||
| | | style="" |The total width can be set here as a percentage of the available page width, for example to 100%. | ||
|- | |- | ||
| | | style="" |Table style | ||
| | | style="" |Here you can load different style sheets for the table. | ||
|- | |- | ||
| | | style="" |Exportable | ||
| | | style="" |Adds a context menu to the table that allows you to save the table in xlsx or csv format. The context menu can be activated by right-clicking. Exportable tables are identified by a yellow background when hovering over them. The yellow color can be removed globally by wiki administrators. The following three lines can be added to the global stylesheet MediaWiki:Common.css:<syntaxhighlight lang="css"> | ||
/* Removal of yellow highlight color of exportable tables */ | |||
#mw-content-text table.bs-et-highlight {background-color: transparent!important;} | |||
The | #mw-content-text table.bs-et-highlight.wikitable {background-color: #f8f9fa!important; | ||
</syntaxhighlight> | |||
|- | |- | ||
| | | style="" |Filterable | ||
| | | style="" |Adds a filter function to the columns of the table. | ||
|- | |- | ||
| | | style="" |Sticky header | ||
| | | style="" |For long tables, the table header remains visible when scrolling the page. | ||
|- | |- | ||
| | | style="" |Caption | ||
| | | style="" |Shows a header above the table: | ||
After disabling the header, it is lost and must be reentered when re-enabled. | |||
|- | |- | ||
| | | style="" |Sortable | ||
| | | style="" |In the first row, a sort function is displayed: | ||
[[File:Weeklyplan 2.0.png|200x200px]] | |||
The current sorting is shown in the title bar. Only one of the two sort arrows will appear in the sorted column. | |||
|- | |- | ||
| | | style="" |Collapsible | ||
| | | style="" |The table can be hidden on the page via a text link. | ||
|- | |- | ||
| | | style="" |Collapsed initially | ||
| | | style="" |If the "Collapsible" property is active, this determines whether the table is visible or hidden when the wiki page is loaded. T | ||
|} | |} | ||
| Line 78: | Line 96: | ||
<span /><br /><gallery> | <span /><br /><gallery> | ||
File:tables-no style.png|No table style | |||
File:Gallery 1.0.png|Standard | File:Gallery 1.0.png|Standard | ||
File:Gallery 2.0.png|Content | File:Gallery 2.0.png|Content | ||
File:Gallery 3.0.png|Content (black) | File:Gallery 3.0.png|Content (black) | ||
File:Gallery 4.0.png|Content (blue) | File:Gallery 4.0.png|Content (blue) | ||
File:Gallery 5.0.png|Content (darkblue) | File:Gallery 5.0.png|Content (darkblue) | ||
File:Gallery 6.0.png|Cusco Sky | File:Gallery 6.0.png|Cusco Sky | ||
File:Gallery 7.0.png|Casablanca | File:Gallery 7.0.png|Casablanca | ||
File:Gallery 8.0.png|Greyscale | File:Gallery 8.0.png|Greyscale | ||
File:Gallery 9.0.png|Greyscale (narrow) | File:Gallery 9.0.png|Greyscale (narrow) | ||
</gallery> | </gallery> | ||
<span><br /></span> | == <span>Sorting special data formats</span> == | ||
<span>If a column should consider special data types when sorting (e.g., date, number), this can be specified in the column header cell's class attribute. Note that a header cell is defined using "!".<br /></span><syntaxhighlight lang="html"> | |||
{| class="wikitable sortable" | |||
|+ | |||
! class="number" |Col A | |||
|- | |||
|1 | |||
|- | |||
|2 | |||
|- | |||
|30 | |||
|- | |||
|11 | |||
|- | |||
|5 | |||
|} | |||
</syntaxhighlight>Output | |||
{| class="wikitable sortable" | |||
|+Sortable number column | |||
! style="width:200px;" class="number" |Col A | |||
|- | |||
| style="width:200px;" |1 | |||
|- | |||
| style="width:200px;" |2 | |||
|- | |||
| style="width:200px;" |30 | |||
|- | |||
| style="width:200px;" |11 | |||
|- | |||
| style="width:200px;" |5 | |||
|} | |||
Possible values are: | |||
* string | |||
* integer | |||
* number | |||
* date<div class="training anwender"> | |||
== Using existing tables == | |||
* Tables can also be inserted as a csv file on a page (just drag the CSV file onto the page in edit mode) | * Tables can also be inserted as a csv file on a page (just drag the CSV file onto the page in edit mode) | ||
* Complex tables can alternatively be attached to the page as an xlsx file. | * Complex tables can alternatively be attached to the page as an xlsx file. | ||
| Line 100: | Line 153: | ||
<span><br /></span> | <span><br /></span> | ||
[[en:{{FULLPAGENAME}}]] | [[en:{{FULLPAGENAME}}]] | ||
[[de:VisualEditor/Tabellen]] | [[de:Handbuch:Erweiterung/VisualEditor/Tabellen]] | ||
Latest revision as of 15:51, 13 May 2025
Insert a table
In VisualEditor, choose "Insert > Tables" to insert a table in a page:
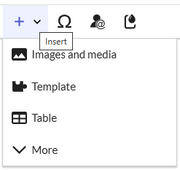
After entering the rows and columns, an empty table appears with the edit menu:
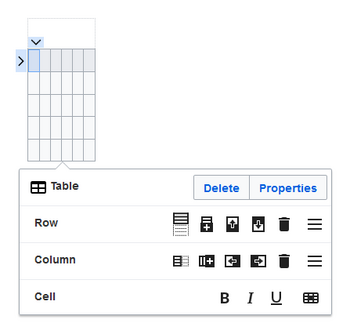
When the mouse rests on a symbol, the respective function is displayed.
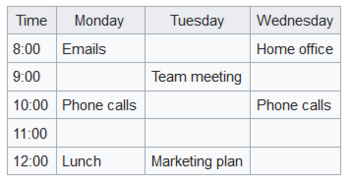
Double-click in the cells to insert text:
Merge rows and columns
To merge a row or column, select the cells in a row or in a column. The inspector will show a "Merge" button. Click it to merge the cells. The same button is called "Unmerge" if you want to separate connected cells.
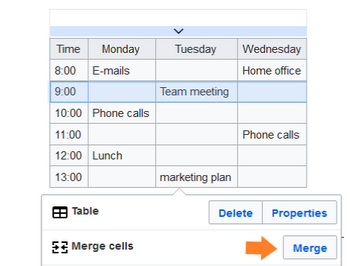
Table properties
In the menu item Properties, there are numerous settings to adjust the functionality and presentation of the table:
| Property | Description |
|---|---|
| Table width | The total width can be set here as a percentage of the available page width, for example to 100%. |
| Table style | Here you can load different style sheets for the table. |
| Exportable | Adds a context menu to the table that allows you to save the table in xlsx or csv format. The context menu can be activated by right-clicking. Exportable tables are identified by a yellow background when hovering over them. The yellow color can be removed globally by wiki administrators. The following three lines can be added to the global stylesheet MediaWiki:Common.css:/* Removal of yellow highlight color of exportable tables */
#mw-content-text table.bs-et-highlight {background-color: transparent!important;}
#mw-content-text table.bs-et-highlight.wikitable {background-color: #f8f9fa!important;
|
| Filterable | Adds a filter function to the columns of the table. |
| Sticky header | For long tables, the table header remains visible when scrolling the page. |
| Caption | Shows a header above the table:
After disabling the header, it is lost and must be reentered when re-enabled. |
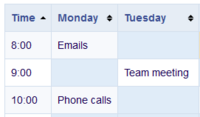
| Sortable | In the first row, a sort function is displayed:
The current sorting is shown in the title bar. Only one of the two sort arrows will appear in the sorted column. |
| Collapsible | The table can be hidden on the page via a text link. |
| Collapsed initially | If the "Collapsible" property is active, this determines whether the table is visible or hidden when the wiki page is loaded. T |
Table styles
The following style sheets can be selected in the Table Style menu. Click on a picture to start the gallery:
-
No table style
-
Standard
-
Content
-
Content (black)
-
Content (blue)
-
Content (darkblue)
-
Cusco Sky
-
Casablanca
-
Greyscale
-
Greyscale (narrow)
Sorting special data formats
If a column should consider special data types when sorting (e.g., date, number), this can be specified in the column header cell's class attribute. Note that a header cell is defined using "!".{| class="wikitable sortable"
|+
! class="number" |Col A
|-
|1
|-
|2
|-
|30
|-
|11
|-
|5
|}
| Col A |
|---|
| 1 |
| 2 |
| 30 |
| 11 |
| 5 |
Possible values are:
- string
- integer
- number
- date
Using existing tables
- Tables can also be inserted as a csv file on a page (just drag the CSV file onto the page in edit mode)
- Complex tables can alternatively be attached to the page as an xlsx file.
Related info
