Server settings
Before you can use VisualEditor in BlueSpice, you have to activate it in your installation:
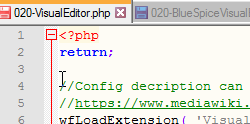
In the BlueSpice installation directory, locate the following files inside the folder „var\www\settings.d“:
020-VisualEditor.php:

020-BlueSpiceVisualEditorConnector.php:

- Remove the line containing the „return;“ command in both files and save them.
- Restart your web server (recommended).
Checking the Configuration manager
In case the VisualEditor is still not appearing, check if VisualEditor is shown as activated in the configuration manager of your wiki:
- Go to Global actions > Config manager
- Make sure the checkbox "Enable VisualEditor for BlueSpice extensions" is activated:
File:ve-config.png
By default, VisualEditor is only activated in the main (Pages) and the User namespaces.
Activating VisualEditor for a namespace
- Go to Global actions > Namespace manager In the column "VisualEditor", you can see which namespaces have VisualEditor activated. They have a green check mark.
- Click the wrench icon in the "Actions" column. The wrench appears, when you hover over the row of the namespace:
- Activate the checkbox for VisualEditor in the dialog window and click "Done":
File:ve-config-namespace-edit.png
- Refresh the Namespace manager page (F5) to confirm the change.
VisualEditor should now be working correctly in all namespaces that actively use it.
Customizing the link to the help pages
By default, the help link for VisualEditor links to the help page for VisualEditor on the BlueSpice helpdesk.
The link can be changed to go to a custom URL:
To configure the url, add:
`$GLOBALS['bsgVisualEditorConnectorHelpUrl'] = 'https://your_url';`
to 'LocalSettings.php' or the appropriate config file.