m (1 revision imported) |
No edit summary |
||
| Line 2: | Line 2: | ||
{{Hint|file=icon_required.png|text= | {{Hint|file=icon_required.png|text=The web server delivers your BlueSpice installation to the users' browsers. Without a web server, BlueSpice cannot be used. The steps listed here are required.}} | ||
== | ==Introduction== | ||
We recommend to use the most system-optimized software possible for a live operation of BlueSpice both under Linux and under Windows. For this reason, the documentation of an installation of Apache (XAMP) under Windows is omitted. This chapter lists the steps that are necessary to install the Microsoft IIS Web Server service on Windows Server >= 2016. | |||
==Open the Server Manager and the Roles Manager== | |||
<span style="color: rgb(51, 51, 51)">'''Open''' the Server Manager (like in the previous step). Unless otherwise configured, it starts automatically as soon as you log in to the server. Otherwise, you will find it in the start menu under the search term "Server Manager". You are now looking at the following view:</span> | |||
= | [[File:Setup:systempreparation_iis_01.png|border|center|400px|IIS Webserver 01|link=Special:FilePath/Setup:systempreparation_iis_01.png]] | ||
'''Click''' "Manage" (1) and then '''click''' "Add Roles and Features" (2): | |||
[[File:Setup: | [[File:Setup:systempreparation_iis_02.png|border|center|400px|IIS Webserver 02|link=Special:FilePath/Setup:systempreparation_iis_02.png]] | ||
==Installation of IIS in the Roles Manager== | |||
Sie befinden sich jetzt im Roles manager. | |||
<span style="color: rgb(51, 51, 51)">'''Click''' "Next >" until you reach the "Server Roles" area (1). There, you '''activate''' the role "Web Server (IIS)" (2):</span> | |||
[[File:Setup: | [[File:Setup:systempreparation_iis_03.png|border|center|400px|IIS Webserver 03|link=Special:FilePath/Setup:systempreparation_iis_03.png]] | ||
== | <span style="color: rgb(51, 51, 51)">'''Click'''</span> <span class="ve-pasteProtect" style="color: rgb(51, 51, 51)">"Add Features" in</span> <span style="color: rgb(51, 51, 51)">the resulting pop-up window:</span> | ||
[[File:Setup:systempreparation_iis_04.png|border|center|400px|IIS Webserver 04|link=Special:FilePath/Setup:systempreparation_iis_04.png]] | |||
'''Click''' "Next >": | |||
[[File:Setup:systempreparation_iis_05.png|border|center|400px|IIS Webserver 05|link=Special:FilePath/Setup:systempreparation_iis_05.png]] | |||
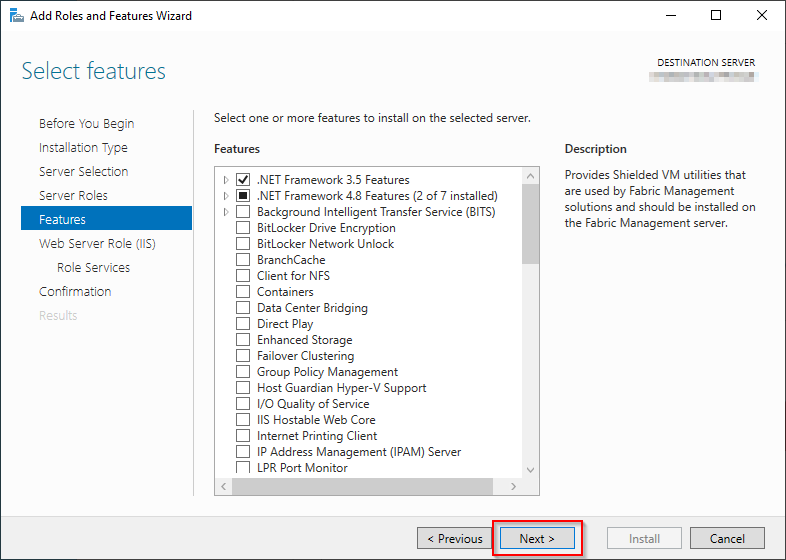
You are now in the section "Features". | |||
'''Click''' "Next >": | |||
[[File:Setup: | [[File:Setup:systempreparation_iis_06.png|border|center|400px|IIS Webserver 06|link=Special:FilePath/Setup:systempreparation_iis_06.png]] | ||
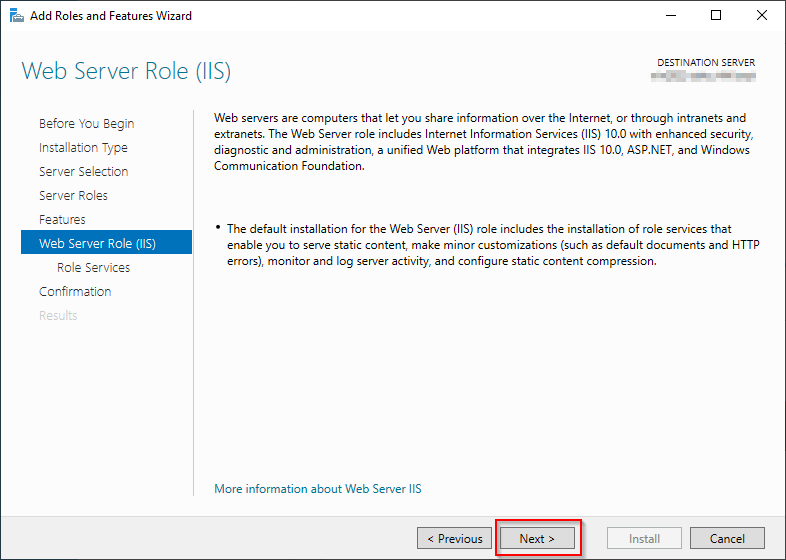
You are now in the section "Web Server Role (IIS)". | |||
'''Click''' "Next>": | |||
[[File:Setup:systempreparation_iis_07.png|border|center|400px|IIS Webserver 07|link=Special:FilePath/Setup:systempreparation_iis_07.png]] | |||
You are now in the section "Role services". | |||
'''Activate''' the option "Windows-Authentication" (2) under "Security" (1) and the option "CGI" (4) under "Application development" (3). | |||
'''Click''' "Next >" (5): | |||
[[File:Setup:systempreparation_iis_08.png|border|center|400px|IIS Webserver 08]] | [[File:Setup:systempreparation_iis_08.png|border|center|400px|IIS Webserver 08|link=Special:FilePath/Setup:systempreparation_iis_08.png]] | ||
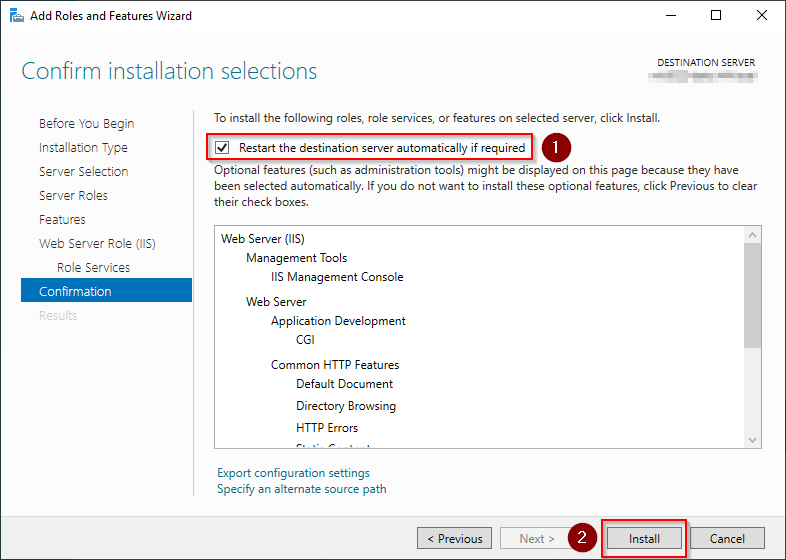
You are now in the "Confirmation" section. | |||
'''Activate''' the option "Restart the destination server automatically if requred" (1) and '''click''' "Install" (2): | |||
[[File:Setup:systempreparation_iis_09.png|border|center|400px|IIS Webserver 09|link=Special:FilePath/Setup:systempreparation_iis_09.png]] | |||
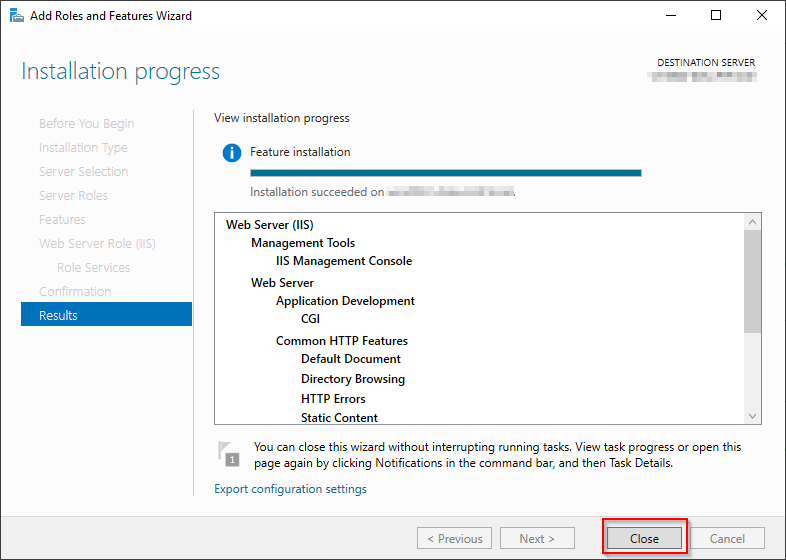
'''Click''' "Close" once the installation has been completed. | |||
[[File:Setup:systempreparation_iis_10.png|border|center|400px|IIS Webserver 10|link=Special:FilePath/Setup:systempreparation_iis_10.png]] | |||
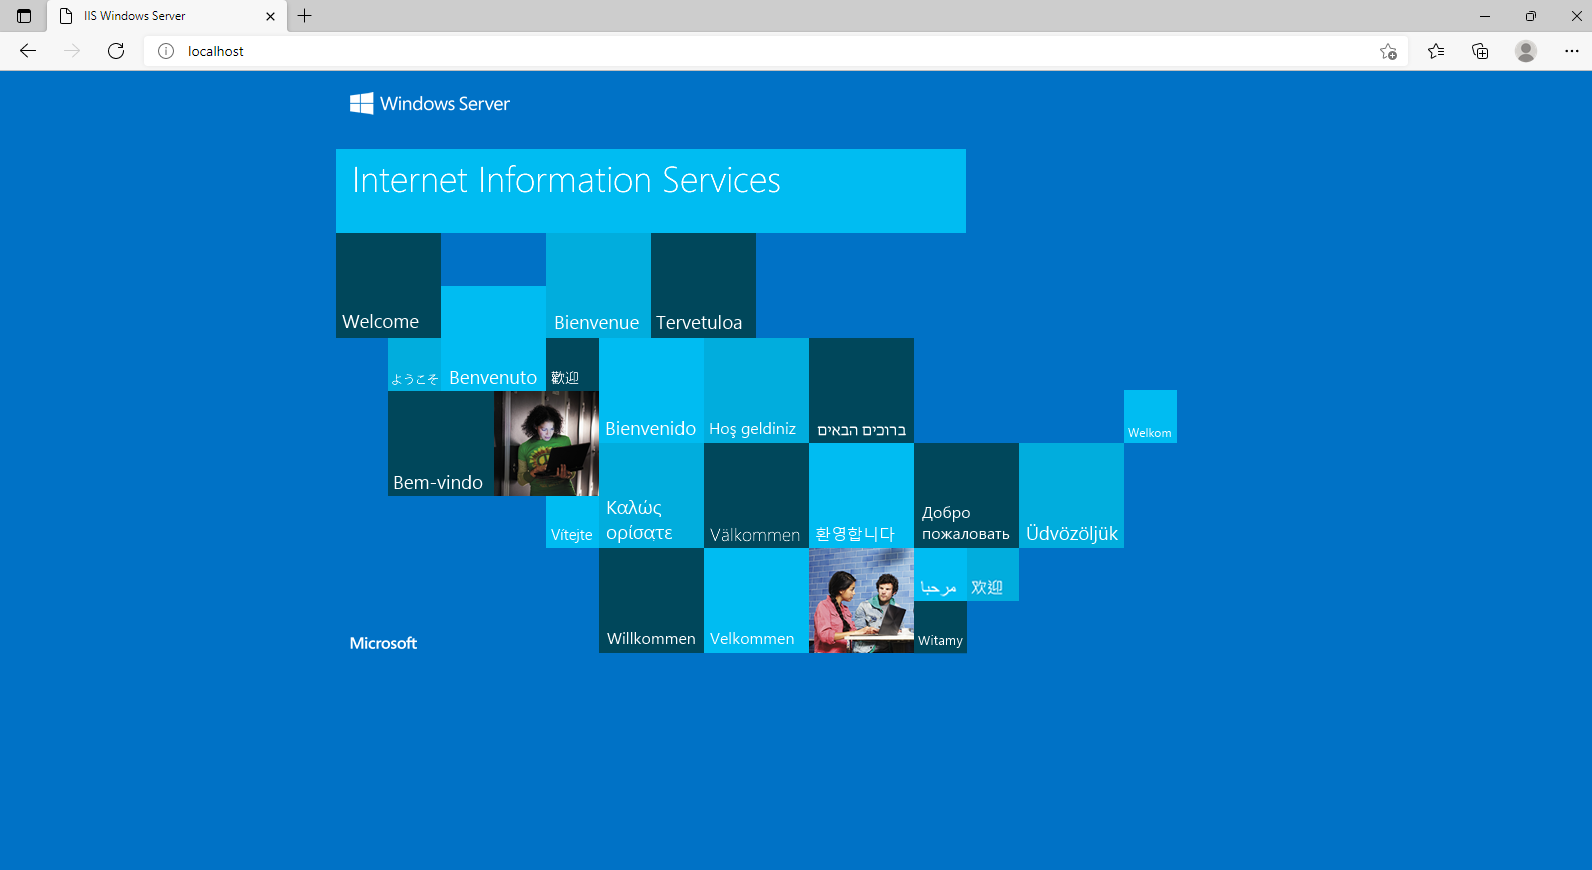
<span style="color: rgb(51, 51, 51)">With the successful completion of all these steps, the IIS web server is now installed. Check the functionality by starting Internet Explorer on the server and calling the URL</span> http://localhost/<span style="color: rgb(51, 51, 51)">. If installed correctly, you will see the welcome page of the IIS Web server:</span> | |||
== | [[File:Setup:systempreparation_iis_11.png|border|center|400px|IIS Webserver 11|link=Special:FilePath/Setup:systempreparation_iis_11.png]] | ||
==Next step== | |||
<span style="color: rgb(51, 51, 51)">If you have successfully completed all of the above steps, proceed to the next step:</span> [[Setup:Installation_Guide/System_Preparation/Windows/urlrewrite|urlrewrite]]. | |||
Latest revision as of 11:30, 9 March 2022
| The web server delivers your BlueSpice installation to the users' browsers. Without a web server, BlueSpice cannot be used. The steps listed here are required. |
Introduction
We recommend to use the most system-optimized software possible for a live operation of BlueSpice both under Linux and under Windows. For this reason, the documentation of an installation of Apache (XAMP) under Windows is omitted. This chapter lists the steps that are necessary to install the Microsoft IIS Web Server service on Windows Server >= 2016.
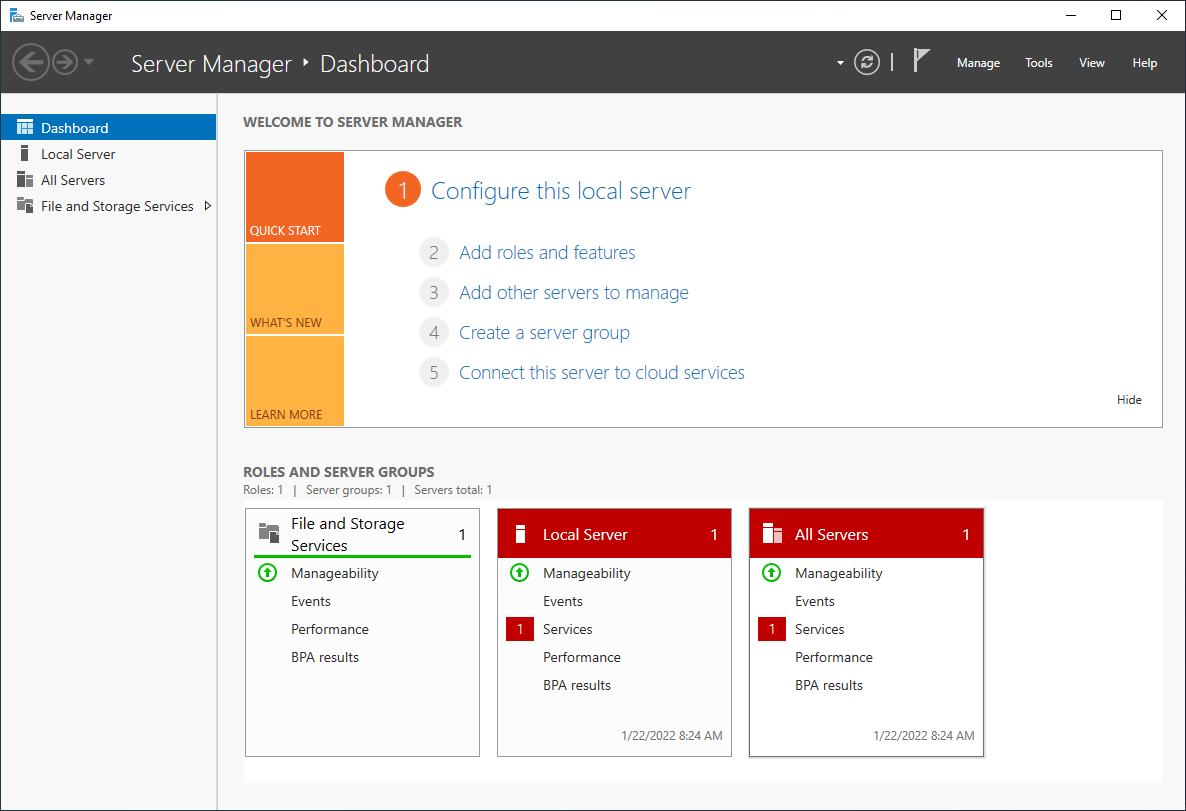
Open the Server Manager and the Roles Manager
Open the Server Manager (like in the previous step). Unless otherwise configured, it starts automatically as soon as you log in to the server. Otherwise, you will find it in the start menu under the search term "Server Manager". You are now looking at the following view:
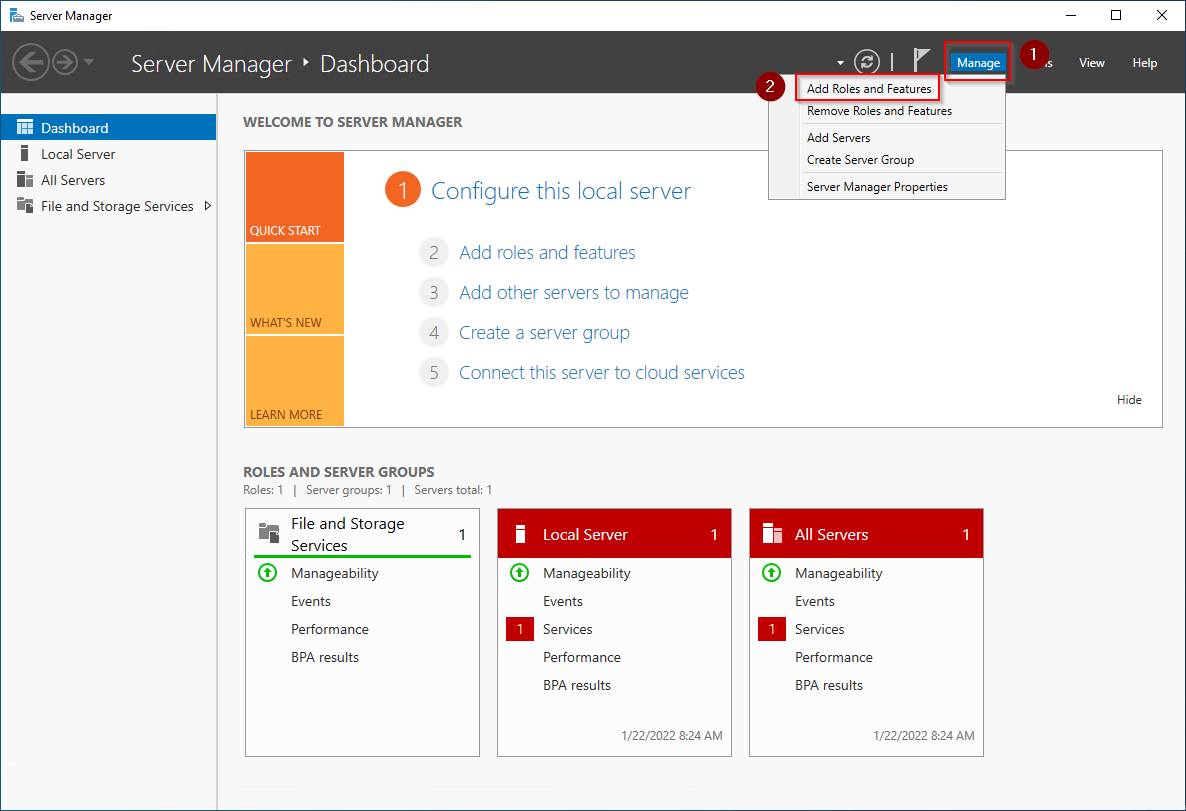
Click "Manage" (1) and then click "Add Roles and Features" (2):
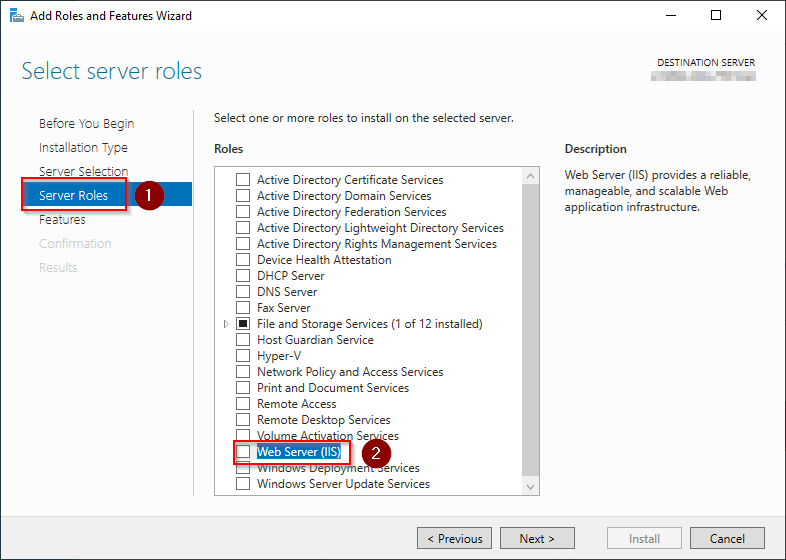
Installation of IIS in the Roles Manager
Sie befinden sich jetzt im Roles manager.
Click "Next >" until you reach the "Server Roles" area (1). There, you activate the role "Web Server (IIS)" (2):
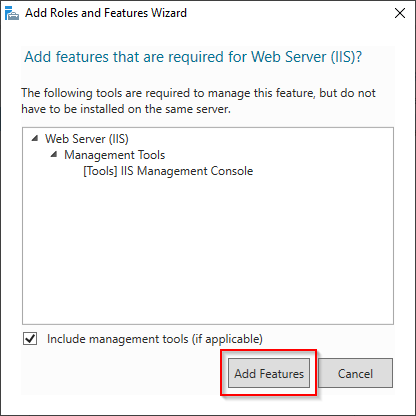
Click "Add Features" in the resulting pop-up window:
Click "Next >":

You are now in the section "Features".
Click "Next >":
You are now in the section "Web Server Role (IIS)".
Click "Next>":
You are now in the section "Role services".
Activate the option "Windows-Authentication" (2) under "Security" (1) and the option "CGI" (4) under "Application development" (3).
Click "Next >" (5):

You are now in the "Confirmation" section.
Activate the option "Restart the destination server automatically if requred" (1) and click "Install" (2):
Click "Close" once the installation has been completed.
With the successful completion of all these steps, the IIS web server is now installed. Check the functionality by starting Internet Explorer on the server and calling the URL http://localhost/. If installed correctly, you will see the welcome page of the IIS Web server:
Next step
If you have successfully completed all of the above steps, proceed to the next step: urlrewrite.
Discussions