No edit summary |
No edit summary |
||
| Line 14: | Line 14: | ||
#'''Click''' ''Select a file'' or drag the Word file in the drop zone.[[File:Manual:importword-upoad.png|alt=Upload dialog|center|thumb|Upload dialog]] | #'''Click''' ''Select a file'' or drag the Word file in the drop zone.[[File:Manual:importword-upoad.png|alt=Upload dialog|center|thumb|Upload dialog]] | ||
#'''Click''' ''Next''. | #'''Click''' ''Next''. | ||
#'''Choose''' the import settings you want.[[File:Manual:importword-settings.png|alt=Settings|center|thumb|Settings]] | #'''Choose''' the import settings you want.[[File:Manual:importword-settings.png|alt=Settings|center|thumb|Settings]] | ||
##'''Title''' | ##'''Title:'''The title of the wiki page generated by the import. When the content structure is broken up, the chapters are created as sub-pages of this main page. | ||
##'''Content structure:''' | ##'''Content structure:''' If the "Split content to pages" checkbox is activated, subpages are created from the heading levels of the Word document. This is possible up to 3 levels deep. | ||
##'''Conflicts with page title''': | ##'''Conflicts with page title''': | ||
##*''Rename:'' | ##*''Rename:'' The imported page is created as <p''age name>'' (1). However, this should be avoided, especially with large Word files that are divided into additional levels. It is best to enter a new page title here as an alternative. A naming conflict is displayed in the preview. In this case, if necessary, click Cancel to start the import with a new title. Or select "Override" as a conflict resolution. | ||
##*''Override'': | ##*''Override'': The existing page(s) will be overwritten with a new version. | ||
#'''Click''' ''Next''. <br /> | #'''Click''' ''Next''. <br />The preview shows: (1) the names of the pages that will be created (2) via the arrow icon: the files that will be imported for the individual pages (3) via the eye icon: the content of the individual wiki pages. | ||
#''' | #'''Click''' ''<u>I</u>mport.'' After the import is complete, the created pages are displayed as a page collection in the wiki. You can view the pages from this page by clicking on the link. | ||
==Create a book== | ==Create a book== | ||
It is easy to create a book from the imported pages: | It is easy to create a book from the imported pages: | ||
# | #'''Click''' the plus button. | ||
# | #'''Enter''' a book title and click Done. | ||
# | #'''Click''' the Bulk Add button. | ||
# | #'''Select''' Page Collection as the source. | ||
# | #'''Select t'''he page name of the imported file. | ||
# | #'''Choose''' ''Save and create chapter navigation'' from the '''Save''' menu. | ||
# | # | ||
# | # | ||
# | # | ||
Revision as of 14:25, 26 July 2022
What is the Word import?
The extension ImportOfficeFiles allows importing a Word document which will be converted to wiki pages.
- The file can be converted to a single page or to a page with subpages.
- Image files are also imported.
- Imported pages can be used as a page collection for creating a book.
Import a word document
To import a Word document:
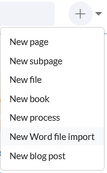
- Click New > Import Word file in the top menu.
Import menu - Click Select a file or drag the Word file in the drop zone.
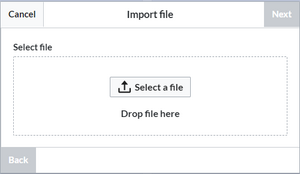
Upload dialog - Click Next.
- Choose the import settings you want.
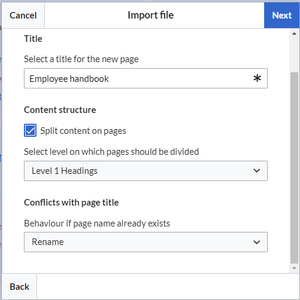
Settings - Title:The title of the wiki page generated by the import. When the content structure is broken up, the chapters are created as sub-pages of this main page.
- Content structure: If the "Split content to pages" checkbox is activated, subpages are created from the heading levels of the Word document. This is possible up to 3 levels deep.
- Conflicts with page title:
- Rename: The imported page is created as <page name> (1). However, this should be avoided, especially with large Word files that are divided into additional levels. It is best to enter a new page title here as an alternative. A naming conflict is displayed in the preview. In this case, if necessary, click Cancel to start the import with a new title. Or select "Override" as a conflict resolution.
- Override: The existing page(s) will be overwritten with a new version.
- Click Next.
The preview shows: (1) the names of the pages that will be created (2) via the arrow icon: the files that will be imported for the individual pages (3) via the eye icon: the content of the individual wiki pages. - Click Import. After the import is complete, the created pages are displayed as a page collection in the wiki. You can view the pages from this page by clicking on the link.


Create a book
It is easy to create a book from the imported pages:
- Click the plus button.
- Enter a book title and click Done.
- Click the Bulk Add button.
- Select Page Collection as the source.
- Select the page name of the imported file.
- Choose Save and create chapter navigation from the Save menu.