No edit summary Tag: 2017 source edit |
No edit summary |
||
| Line 26: | Line 26: | ||
== How it works == | == How it works == | ||
The template defines some variables to determine which languages you want to support: | The template defines some variables to determine which languages you want to support: | ||
# It automatically determines the content language of your wiki installation. This variable is required and must not be deleted. | |||
# You need to define at least one language for the switcher to make sense. Each language variable is named as "l1", "l2",.... The value needs to be provided as the [https://de.wikipedia.org/wiki/Liste_der_ISO-639-1-Codes ISO 639-1 language code] for the language. For Spanish, you would define:<syntaxhighlight lang="text"> | |||
<syntaxhighlight lang="text"> | |||
{{#vardefine:l4|es}} | {{#vardefine:l4|es}} | ||
</syntaxhighlight> | </syntaxhighlight> | ||
# After defining the variables, you need to add them to the actual switcher:<syntaxhighlight lang="text"> | |||
<syntaxhighlight lang="text"> | {{#switch: {{SUBPAGENAME}} | ||
|{{#var:l1}}={{#var:switcher}} | |||
|{{#var:l2}}={{#var:switcher}} | |||
|{{#var:l3}}={{#var:switcher}} | |||
|{{#var:l4}}={{#var:switcher}} | |{{#var:l4}}={{#var:switcher}} | ||
|{{#var:clswitcher}}}} | |||
</syntaxhighlight> | </syntaxhighlight> | ||
# In addition, you should add the language to the template description for the extension [[Reference:TemplateData|TemplateData]]:<syntaxhighlight lang="text"> | |||
<syntaxhighlight lang="text"> | "description": { | ||
"{{#var:l4}}": "Cambiador de idioma" | "{{#var:cl}}": "Language switcher", | ||
"{{#var:l1}}": "Sprachwechsler", | |||
"{{#var:l2}}": "Sélecteur de langue", | |||
"{{#var:l3}}": "Taal verandering", | |||
"{{#var:l4}}": "Cambiador de idioma" | |||
} | |||
</syntaxhighlight> | </syntaxhighlight> | ||
==Displaying the switcher on a page== | ==Displaying the switcher on a page== | ||
For the language switcher to work, you need to create the language versions of a page as subpages of the actual content language, e.g. in an English wiki: | For the language switcher to work, you need to create the language versions of a page as subpages of the actual content language, e.g. in an English wiki: | ||
| Line 51: | Line 58: | ||
# Provide a display title if the page is a subpage. For example for the Vacation policy/de, enter "Urlaubsregelung":[[File:HW-languageswitcher-templatedata.png|alt=Setting a display title|center|thumb|400x400px|Setting a display title]] | # Provide a display title if the page is a subpage. For example for the Vacation policy/de, enter "Urlaubsregelung":[[File:HW-languageswitcher-templatedata.png|alt=Setting a display title|center|thumb|400x400px|Setting a display title]] | ||
__NOTOC__ | |||
By default, the language switcher appears on the right side of the page. To display it on the left side, change the following line in the page Template:Languages/styles.css:<syntaxhighlight lang="css"> | |||
#langbar-hz {text-align: left;} | |||
</syntaxhighlight>__NOTOC__ | |||
Revision as of 10:46, 23 March 2022

This template creates a language switcher that supports English, German and French language pages. It can be inserted into a wiki page via the VisualEditor Insert > Template menu.
Importing the template[edit | edit source]
(The download file here only works in a wiki that is set to the content language English. For downloading the file for a wiki with content language set to German, go to the German Helpdesk.)
The import file is included in the archive file HW-LanguageSwitcher.zip. Unpack the zip file first.
On the page Special:Import follow these steps:
- Select file and choose HW-LanguageSwitcher.xml.
- Enter an Interwiki prefix. Since this field is required, simply add hw (for hallowelt).
- Keep the selection Import to default locations.
- Click Upload file... .
The template is now available in your wiki.
Pages included in the import[edit | edit source]
The xml import creates the following files in your wiki:
- Template:Languages
- Template:Languages/styles.css
How it works[edit | edit source]
The template defines some variables to determine which languages you want to support:
- It automatically determines the content language of your wiki installation. This variable is required and must not be deleted.
- You need to define at least one language for the switcher to make sense. Each language variable is named as "l1", "l2",.... The value needs to be provided as the ISO 639-1 language code for the language. For Spanish, you would define:
{{#vardefine:l4|es}} - After defining the variables, you need to add them to the actual switcher:
{{#switch: {{SUBPAGENAME}} |{{#var:l1}}={{#var:switcher}} |{{#var:l2}}={{#var:switcher}} |{{#var:l3}}={{#var:switcher}} |{{#var:l4}}={{#var:switcher}} |{{#var:clswitcher}}}} - In addition, you should add the language to the template description for the extension TemplateData:
"description": {
        "{{#var:cl}}": "Language switcher",
		"{{#var:l1}}": "Sprachwechsler",
		"{{#var:l2}}": "Sélecteur de langue",
		"{{#var:l3}}": "Taal verandering",
		"{{#var:l4}}": "Cambiador de idioma"
	}
Displaying the switcher on a page[edit | edit source]
For the language switcher to work, you need to create the language versions of a page as subpages of the actual content language, e.g. in an English wiki:
- Vacation policy
- Vacation policy/de
- Vacation policy/fr
The template is then added to each language version:
- Add the template Languages from the VisualEditor insert-dialog.
- Provide a display title if the page is a subpage. For example for the Vacation policy/de, enter "Urlaubsregelung":
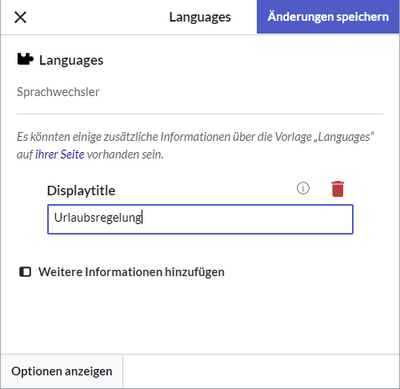
Setting a display title

By default, the language switcher appears on the right side of the page. To display it on the left side, change the following line in the page Template:Languages/styles.css:
#langbar-hz {text-align: left;}