(Difference between pages)
No edit summary Tag: 2017 source edit |
No edit summary |
||
| Line 1: | Line 1: | ||
<div class="downloadarea"> | |||
<span class="getButton">[[Media:HW-employee.zip|Download]]</span> | |||
< | |||
- | |||
< | |||
* | [[File:Employees gallery.png|alt=Screenshot of employees gallery|450x450px]] | ||
< | </div>This template creates an employees gallery that you can include on portal pages, for example. | ||
==Importing the template== | |||
{{Templateimport|HW-Employee}} | |||
==Pages included in the import== | |||
The xml import creates the following files in your wiki: | |||
*Template:Employee | |||
*Template:Employee/styles.css | |||
==Creating the employee gallery== | |||
You can add each individual employee card as a template. Alternatively, you can [[Templates download/Employee#Adding a "batch" of employees|add a "batch" of employees]] directly in the source mode of the page. | |||
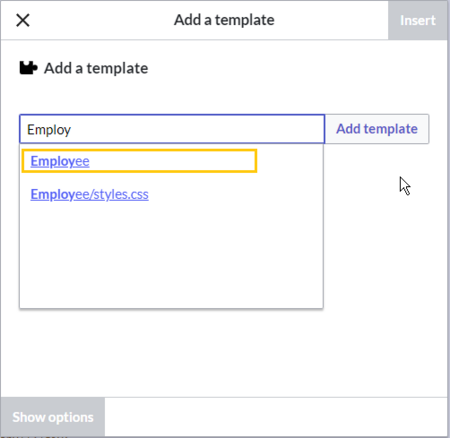
# From the Visual Editor ''Insert > Template'' menu, add the template "Employee". [[File:Employee template.png|alt=Screenshot of dialog to select the Employee template|center|thumb|450x450px|Select the Employee template]] | |||
# Provide the necessary information in the [[Templates download/Employee#Available parameters|parameter fields]]. | |||
=== Adding a "batch" of employees === | |||
To speed up the process, you can quickly add the template multiple times directly in the source editing mode. This also allows you to add a colored grey wrapper around the gallery:<syntaxhighlight lang="text"> | |||
<div style="background:#e9e9ee"> | |||
{{Employee|title=Title|image=|name=Employee name|department=Department|username=}} | |||
{{Employee|title=Title|image=|name=Employee name|department=Department|username=}} | |||
{{Employee|title=Title|image=|name=Employee name|department=Department|username=}} | |||
{{Employee|title=Title|image=|name=Employee name|department=Department|username=}} | |||
{{Employee|title=Title|image=|name=Employee name|department=Department|username=}} | |||
{{Employee|title=Title|image=|name=Employee name|department=Department|username=}} | |||
</div> | |||
</syntaxhighlight> | |||
== Available parameters== | |||
{| class="wikitable" style="width: 100%;" | |||
! style="background-color:rgb(234, 236, 240);text-align:center;box-sizing:inherit;padding:0.2em 0.4em;border:1px solid rgb(162, 169, 177);" class="" | | |||
! style="background-color:rgb(234, 236, 240);text-align:center;width:200px;box-sizing:inherit;padding:0.2em 0.4em;border:1px solid rgb(162, 169, 177);" class="" |Element | |||
! style="background-color:rgb(234, 236, 240);text-align:center;width:180px;box-sizing:inherit;padding:0.2em 0.4em;border:1px solid rgb(162, 169, 177);" class="" |Value | |||
! style="background-color:rgb(234, 236, 240);text-align:center;box-sizing:inherit;padding:0.2em 0.4em;border:1px solid rgb(162, 169, 177);" class="" | Description | |||
|- | |||
|1 | |||
|title | |||
|text | |||
|Job title | |||
|- | |||
|2 | |||
|image | |||
|file name (without naemspace prefix) | |||
|Name of the uploaded user image (e.g.: lastnamefirstname.png). If left empty, the template looks for the profile image of the user. | |||
|- | |||
|3 | |||
|name | |||
|text | |||
|Name of the employee | |||
|- | |||
|4 | |||
|department | |||
|text | |||
|Department of the employee | |||
|- | |||
|5 | |||
|username | |||
|username (without namespace prefix) | |||
|If the user exists in the wiki and the user name is provided, the employee card links to the user's profile page. | |||
|- | |||
|6 | |||
|employeepage | |||
|name of a wiki page | |||
|If the employee does not exist as user, an employee page can be created anywhere in the wiki. If a page name is provided here, the employee card links to that page. | |||
|} | |||
__NOTOC__ | |||
[[en:Vorlagen_Download/Seitenbanner]] | |||
[[en:{{FULLPAGENAME}}]] | |||
Revision as of 15:47, 11 May 2023
This template creates an employees gallery that you can include on portal pages, for example.
Importing the template
Importing the template
The import file is included in the archive file HW-Employee.zip. Unpack the zip file first.
On the page Special:Import follow these steps:
- Select file and choose HW-Employee.xml.
- Enter an Interwiki prefix. Since this field is required, simply add hw (for hallowelt).
- Keep the selection Import to default locations.
- Click Upload file... .
The template is now available in your wiki.
Pages included in the import
The xml import creates the following files in your wiki:
- Template:Employee
- Template:Employee/styles.css
Creating the employee gallery
You can add each individual employee card as a template. Alternatively, you can add a "batch" of employees directly in the source mode of the page.
- From the Visual Editor Insert > Template menu, add the template "Employee".
- Provide the necessary information in the parameter fields.
Adding a "batch" of employees
To speed up the process, you can quickly add the template multiple times directly in the source editing mode. This also allows you to add a colored grey wrapper around the gallery:
<div style="background:#e9e9ee">
{{Employee|title=Title|image=|name=Employee name|department=Department|username=}}
{{Employee|title=Title|image=|name=Employee name|department=Department|username=}}
{{Employee|title=Title|image=|name=Employee name|department=Department|username=}}
{{Employee|title=Title|image=|name=Employee name|department=Department|username=}}
{{Employee|title=Title|image=|name=Employee name|department=Department|username=}}
{{Employee|title=Title|image=|name=Employee name|department=Department|username=}}
</div>
Available parameters
| Element | Value | Description | |
|---|---|---|---|
| 1 | title | text | Job title |
| 2 | image | file name (without naemspace prefix) | Name of the uploaded user image (e.g.: lastnamefirstname.png). If left empty, the template looks for the profile image of the user. |
| 3 | name | text | Name of the employee |
| 4 | department | text | Department of the employee |
| 5 | username | username (without namespace prefix) | If the user exists in the wiki and the user name is provided, the employee card links to the user's profile page. |
| 6 | employeepage | name of a wiki page | If the employee does not exist as user, an employee page can be created anywhere in the wiki. If a page name is provided here, the employee card links to that page. |


Discussions