Templates download/Language switcher and Templates download/Icon: Difference between pages

(Difference between pages)
No edit summary
 
No edit summary
 
Line 1: Line 1:
<div class="downloadarea">
<span class="getButton">[[Media:HW-LanguageSwitcher.zip|Download]]</span>
<span class="getButton">[[Media:HW-Icon.zip|Download]]</span>
 
[[File:HW-languageswitcher.png|350x350px|alt=language switcher screenshot]]
</div>This download file includes two versions of a language switcher. Supported languages can be defined in the templates.


[[File:Icon-template.png|350x350px|alt=example of icons on a page]]</div>This template makes it possible to insert Bootstrap icons on a page.
==Importing the template==
The import file is included in the archive file ''HW-LanguageSwitcher.zip''. Unpack the zip file first.
The import file is included in the archive file ''HW-Icon.zip''. Unpack the zip file first.


On the page ''Special:Import'' follow these steps:
On the page ''Special:Import,'' follow these steps:
 
#'''''Select file''''' and choose HW-Icon.xml.
#'''Select file''' and choose ''HW-LanguageSwitcher.xml''.
#'''Enter''' an ''interwiki prefix''. Since this field is required, simply add hw (for hallowelt).
#'''Enter''' an Interwiki prefix. Since this field is required, simply add ''hw'' (for hallowelt).
#'''Keep''' the selection ''Import to default locations''.
#'''Click''' ''Upload file...'' .
 
The template is now available in your wiki.
The templates are now available in your wiki.
==<span class="mw-headline" id="Pages_included_in_the_import">Pages included in the import</span>==
==Pages included in the import==
The xml import creates the following file in your wiki:
The xml import creates the following files in your wiki:
*Template:Icon
 
==<span class="mw-headline" id="Using_the_template">Using the template</span>==
* Template:Languages
#
* Template:InterLanguages
#'''Find''' a bootstrap icon from the Bootstrap website at https://icons.getbootstrap.com/
* Template:Languages/styles.css
#'''Click''' on the icon you would like to use. The icon page shows you the class-name of the icon on the right side of the page:[[File:bootstrap-award-icon.png|alt=Bootstrap icon css-class|center|thumb|650x650px|Bootstrap icon css-class]]
 
#'''Highlight''' the class name (it has the format ''bi bi-myicon'') and '''copy''' it to your clipboard (ctrl+c).
== How it works ==
# '''Enter''' <code><nowiki>{{</nowiki></code> in visual editing mode at the cursor position where you want to insert the icon. The template editor opens.
 
# '''Copy''' the icon class from your clipboard:[[File:template-editor-icon.png|alt=Template editor|center|thumb|450x450px|Template editor]]
=== Template:Languages ===
# '''Change''' the font size (optional) if you want the size to be different from the text surrounding it (e.g., from the size of a heading if the icon is placed in the heading or of the paragraph text if the icon is placed in the flow-text.  Smaller than text icons are usually sized no smaller than 0.85em and larger icons up to 2.5em.
This template is used to switch between a page and its translated versions when the translations are maintained as subpages.
#'''Color:''' If you want the color to be different from the surrounding text, you can specify any web color (e.g., a color name like blue or a hex-valuesuch as #0059b3 for a more specific blue). A list of web colors can be found at https://www.w3schools.com/colors/colors_picker.asp
 
#'''Vertical alignment:''' It should not be necessary to provide an alignment value. The standard is set to text-top and usually works in headings and in flow-text. If it looks a little off, you can try other vertical-alignment values, such as text-bottom. For a full list of possible values, see https://www.w3schools.com/cssref/pr_pos_vertical-align.asp.
The template defines some variables to determine which languages you want to support. It automatically determines the content language of your wiki installation. '''This variable "cl" is required and must not be deleted.'''
#'''Click''' ''Apply changes''.
* You need to define at least one language for the switcher to make sense. Each language variable is named as lowercase l (for language)  "l1", "l2",.... The value needs to be provided as the [https://de.wikipedia.org/wiki/Liste_der_ISO-639-1-Codes ISO 639-1 language code] for the language. For Spanish, you would define:<syntaxhighlight lang="text">
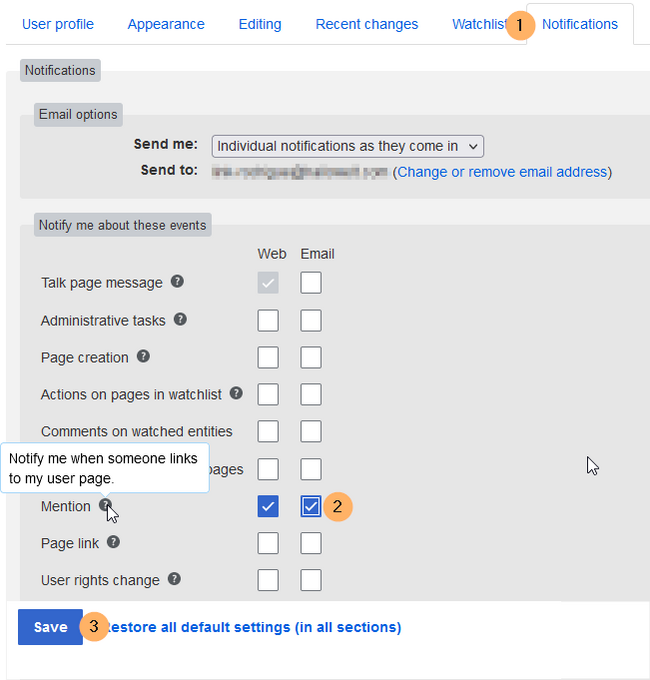
==Activate notifications==
{{#vardefine:l4|es}}
Users can activate notifications for mentions in their [[Manual:Preferences|personal preferences]]:
</syntaxhighlight>
#'''Select''' the tab ''Notifications''.
* After defining the variables, you need to add them to the actual switcher:<syntaxhighlight lang="text">
#'''Activate''' the notifications options for mentions.
{{#switch: {{SUBPAGENAME}}
#'''Save''' your changes. [[File:HW-mention-notificationsettings.png|center|thumb|680x680px|Activating notifications|link=Special:FilePath/HW-mention-notificationsettings.png]]
|{{#var:l1}}={{#var:switcher}}
|{{#var:l2}}={{#var:switcher}}
|{{#var:l3}}={{#var:switcher}}
|{{#var:l4}}={{#var:switcher}}
|{{#var:clswitcher}}}}
</syntaxhighlight>
*A tracking property enssures that the different languages are available for further processing through Semantic MediaWiki. This allows to create page lists of the different languages.:<syntaxhighlight lang="text">
<!-- set tracking property //-->
[[Languages/tracklang::{{#switch: {{SUBPAGENAME}}|{{#var:l1}}={{#var:l1}}|{{#var:l2}}={{#var:l2}}|{{#var:l3}}={{#var:l3}}|{{#var:l4}}={{#var:l4}}|{{#var:cl}}}}]]
</syntaxhighlight>
 
*Alternatively, especially in BluesSpice free (where no SMW functions and therefore no attributes are available by default), tracking categories can be used. These are commented out in the template by default. The comment must therefore be removed and all languages tracked as a category:<syntaxhighlight lang="text">
{{#switch: {{SUBPAGENAME}}|{{#var:l1}}=[[Category:{{#var:l1}}]]|{{#var:l2}}=[[Category:{{#var:l2}}]]|{{#var:l3}}=[[Category:{{#var:l3}}]]|{{#var:l4}}=[[Category:{{#var:l4}}]]|[[Category:{{#var:cl}}]]}}
</syntaxhighlight>
* In addition, you should add the language to the template description for the extension [[Reference:TemplateData|TemplateData]]:<syntaxhighlight lang="text">
"description": {
        "en": "Language switcher",
"de": "Sprachwechsler",
"fr": "Sélecteur de langue",
"nl": "Taal verandering",
"es": "Cambiador de idioma"
}
</syntaxhighlight>
 
=== Template:InterLanguages ===
This template is used to switch between a page and its translated versions when the translations are not maintained as subpages, but are technically not associated at all.
 
The template defines some variables to determine which languages you want to support.  '''The variable "self" defines the current page. It is required and must not be deleted.'''
 
The language variables are defined just like in the template Languages. If you define additional language variables, the newly defined languages has to be added to the language menu. The links are created in the following container:<syntaxhighlight lang="text">
<div id="langbar-hz">
...
</div>
</syntaxhighlight>Simply add each language with the l-number matching your language variable by copying this line and replacing the number:<syntaxhighlight lang="text">
{{#if: {{{pgnamel4|}}}|{{#switch:{{{pgnamel4|}}}|{{#var:self}}=[[{{FULLPAGENAME}}{{!}}{{#var:l4}}]]|[[{{{pgnamel4}}}{{!}}{{#var:l4}}]]}}|}}
</syntaxhighlight>In addition, you need to add the language to the template description and the available fields in the TemplateData editor.
 
In source editing mode:
 
# '''Click''' ''Manage TemplateData''[[File:interlanguages-manageTD.png|alt=Manage TemplateData|center|thumb|650x650px|Manage TemplateData]]<br />
# '''Click''' ''Add parameter''[[File:interlanguages-manageTD-addparam.png|alt=Add new languages (as parameters)|center|thumb|514x514px|Add new languages (as parameters)]]
# '''Select''' any new language you have added and click '''Apply'''.[[File:interlanguages-manageTD-editparam.png|alt=Selecting a newly added paramter|center|thumb|515x515px|Selecting a newly added paramter]]
# '''Add''' the language abbreviation for the new language as a label and activate the ''Suggested'' checkbox and click '''Done.'''[[File:interlanguages-manageTD-paraminfo.png|alt=Parameter settings|center|thumb|521x521px|Parameter settings]]
# '''Click''' ''Add language'' to add a new template description for this language.[[File:interlanguages-manageTD-addlang.png|alt=adding a template description|center|thumb|450x450px|adding a template description]]
# '''Select''' the user language that corresponds to the current language parameter.[[File:interlanguages-manageTD-addlang-es.png|alt=select user language|center|thumb|450x450px|select user language]]<br />
# '''Enter''' a template description and click '''Apply'''. This description is shown when the user selects a template in the visual editor.[[File:interlanguages-manageTD-addlang-es-desc.png|alt=template description|center|thumb|450x450px|template description]]
{{Messagebox|boxtype=important|icon=|Note text=If you have changed the original default values for the language variables, make sure to change the language labels here accordingly. The labels for the l1, l2, l3,... languages need to match.<br/>[[File:interlanguages-manageTD-labels.png|alt=check correct language associations|center|thumb|250x250px|check correct language associations]]|bgcolor=}}
 
==Displaying the switcher on a page==
For the language switcher to work, you need to create the  language versions of a page as subpages of the actual content language, e.g. in an English wiki:
 
*Vacation policy
*Vacation policy/de
*Vacation policy/fr
 
The template is then added to each language version:
#Add the template ''Languages'' from the [[Manual:Extension/VisualEditor|VisualEditor]] insert-dialog.
#Provide a display title if the page is a subpage. For example for the Vacation policy/de, enter "Urlaubsregelung":[[File:HW-languageswitcher-templatedata.png|alt=Setting a display title|center|thumb|400x400px|Setting a display title]]
 
==Alignment of the language switcher==
By default, the language switcher appears on the right side of the page. To display it on the left side, change the following line in the page Template:Languages/styles.css:<syntaxhighlight lang="css">
#langbar-hz {text-align: left;}
</syntaxhighlight>
 
== Adding the language switcher to a page ==
 
* [[Multilingual wiki#Creating wiki pages with translated subpages|Using the language switcher template Languages]] (for language versions that are maintained as subpages)
* [[Multilingual wiki#Connecting unrelated wiki pages|Using the language switcher template InterLanguages]] (for language versions that are maintained as independent pages)
__NOTOC__

Revision as of 17:24, 6 April 2022

This template makes it possible to insert Bootstrap icons on a page.

Importing the template

The import file is included in the archive file HW-Icon.zip. Unpack the zip file first.

On the page Special:Import, follow these steps:

  1. Select file and choose HW-Icon.xml.
  2. Enter an interwiki prefix. Since this field is required, simply add hw (for hallowelt).
  3. Keep the selection Import to default locations.
  4. Click Upload file... .

The template is now available in your wiki.

Pages included in the import

The xml import creates the following file in your wiki:

  • Template:Icon

Using the template

  1. Find a bootstrap icon from the Bootstrap website at https://icons.getbootstrap.com/
  2. Click on the icon you would like to use. The icon page shows you the class-name of the icon on the right side of the page:
    Bootstrap icon css-class
    Bootstrap icon css-class
  3. Highlight the class name (it has the format bi bi-myicon) and copy it to your clipboard (ctrl+c).
  4. Enter {{ in visual editing mode at the cursor position where you want to insert the icon. The template editor opens.
  5. Copy the icon class from your clipboard:
    Template editor
    Template editor
  6. Change the font size (optional) if you want the size to be different from the text surrounding it (e.g., from the size of a heading if the icon is placed in the heading or of the paragraph text if the icon is placed in the flow-text. Smaller than text icons are usually sized no smaller than 0.85em and larger icons up to 2.5em.
  7. Color: If you want the color to be different from the surrounding text, you can specify any web color (e.g., a color name like blue or a hex-valuesuch as #0059b3 for a more specific blue). A list of web colors can be found at https://www.w3schools.com/colors/colors_picker.asp
  8. Vertical alignment: It should not be necessary to provide an alignment value. The standard is set to text-top and usually works in headings and in flow-text. If it looks a little off, you can try other vertical-alignment values, such as text-bottom. For a full list of possible values, see https://www.w3schools.com/cssref/pr_pos_vertical-align.asp.
  9. Click Apply changes.

Activate notifications

Users can activate notifications for mentions in their personal preferences:

  1. Select the tab Notifications.
  2. Activate the notifications options for mentions.
  3. Save your changes.
    Activating notifications


To submit feedback about this documentation, visit our community forum.

No categories assignedEdit

Discussions