No edit summary |
(Changed categories.) |
||
| Line 1: | Line 1: | ||
It is possible to include the results of the "Recent changes" special page in a wiki page. | |||
== Adding the changelist to a page == | |||
To show the Recent changes list on any page in the wiki, you can simply transclude it by adding the following to your page source:<syntaxhighlight lang="text"> | |||
{{Special:RecentChanges}} | |||
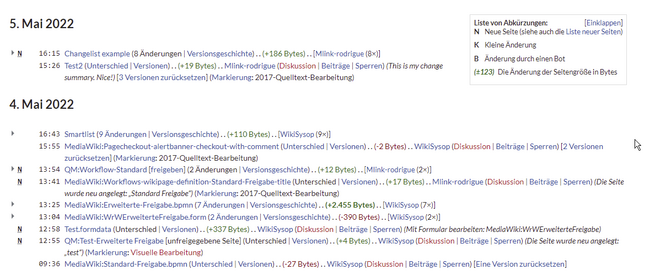
</syntaxhighlight>This will simply output the same content as is shown on the page ''Special:RecentChanges''. | |||
[[File:Include Recent changes.png|alt=Recent changes included in a wiki page|center|thumb|650x650px|Recent changes included in a wiki page]] | |||
== Limiting the displayed information == | |||
Sometimes, you might want to limit the information that is shown for recent changes. | |||
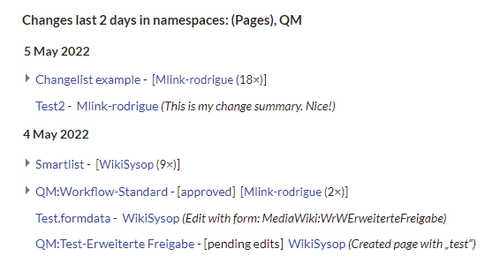
[[File:recent changes filtered include.png|link=https://en.wiki.bluespice.com/wiki/File:recent%20changes%20filtered%20include.png|alt=Recent changes filtered view|center|thumb|500x500px|Recent changes filtered view]] | |||
To do this, you need to make two changes: | |||
# '''Add a wrapper and filter paramters:''' Apply a wrapper around your transclusion for formatting purposes and add some filter parameters to limit the results in the list. | |||
# '''Format the output:''' Remove the unnecessary information through some style adjustment in the page MediaWiki:Common.css (admin rights required) | |||
=== Add a wrapper and filter parameters === | |||
You can set some parameters in the tag to filter some information. The following example shows up to the latest 100 changes in the last 7 days in the main namespace (Pages):<syntaxhighlight lang="text"> | |||
<div class="rcinclude">{{Special:RecentChanges|limit=100|days=7|namespace=0}}</div> | |||
</syntaxhighlight>To show changes in additional namespaces, add them to the namepace parameter, separated by a semi-colon:<syntaxhighlight lang="text"> | |||
<div class="rcinclude">{{Special:RecentChanges|limit=100|days=7|namespace=0;3010}}</div> | |||
</syntaxhighlight> | |||
=== Format the output === | |||
After adding the <nowiki><div class="rinclude">...</div></nowiki> wrapper around your transclusion content, you can now use this rinclude class to style the output and to hide some unnecessary information. This class is important, because it ensures that other pages in the wiki, such as the actual "Recent changes" special page or the version history pages in your wiki are not affected by these changes. | |||
To filter out additional detail information — such as change in file size, markers, or direct links to the version comparison —, add the following to the page ''MediaWiki:Common.css'' (admin rights required):<syntaxhighlight lang="text"> | |||
/** custom formatting for recent changes that are included on a wiki page with a div-wrapper of css-class .rcinclude **/ | |||
/* first style declaration hides all unnecessary info such as bytes, direct links to differences, links related to user, and markers */ | |||
.rcinclude .mw-changeslist-line-inner-userTalkLink, | |||
.rcinclude .mw-diff-bytes, | |||
.rcinclude .mw-tag-markers, | |||
.rcinclude .mw-changeslist-legend, | |||
.rcinclude .mw-changeslist-line-inner-rollback, | |||
.rcinclude .mw-changeslist-links, | |||
.rcinclude .mw-changeslist-separator, | |||
.rcinclude.mw-rollback-link, | |||
.rcinclude .mw-rollback-link {display:none} | |||
/* remove the "New" indicator from the time in front of each entry - they can only be removed together */ | |||
.rcinclude td.mw-enhanced-rc {display:none} | |||
/* increase spacing between entries */ | |||
.rcinclude .mw-changeslist-line {margin-bottom:0.6em} | |||
/* separate page title and user name */ | |||
.rcinclude .mw-title::after {content:" -"} | |||
/* make the day heading more compact */ | |||
.rcinclude .mw-changeslist h4 {font-size:0.95em; margin:1em 0 0.5em 0} | |||
/* remove unnecessary space in the expanded version rows */ | |||
.rcinclude tr.mw-rcfilters-ui-highlights-enhanced-nested td:nth-child(3){display:none} | |||
/** end recent changes formatting **/ | |||
</syntaxhighlight>After saving these changes in MediaWiki:Common.css, you should now see the modified output of the transcluded content as shown in the previous screenshot. | |||
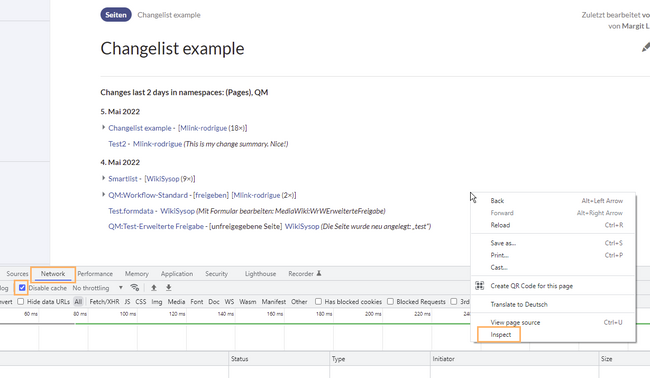
If you still see the original formatting, you will need to clear the network cache: | |||
# '''Right-click''' on the wiki page that contains the "Recent changes" transclusion. | |||
# '''Click''' ''Inspect''. | |||
# Activate Disable cache | |||
# '''Press''' ''F5'' on your keyboard to refresh the page. | |||
[[File:disable caching.png|alt=disable network cache|center|thumb|650x650px|disable network cache]] | |||
[[en:{{FULLPAGENAME}}]] | [[en:{{FULLPAGENAME}}]] | ||
[[de: | [[de:Letzte Änderungen Transklusion]] | ||
[[Category:Organiz]] | |||
[[Category:Organization]] | |||
[[Category:Portal]] | |||
Revision as of 09:43, 6 May 2022
It is possible to include the results of the "Recent changes" special page in a wiki page.
Adding the changelist to a page
To show the Recent changes list on any page in the wiki, you can simply transclude it by adding the following to your page source:
{{Special:RecentChanges}}
This will simply output the same content as is shown on the page Special:RecentChanges.
Limiting the displayed information
Sometimes, you might want to limit the information that is shown for recent changes.
To do this, you need to make two changes:
- Add a wrapper and filter paramters: Apply a wrapper around your transclusion for formatting purposes and add some filter parameters to limit the results in the list.
- Format the output: Remove the unnecessary information through some style adjustment in the page MediaWiki:Common.css (admin rights required)
Add a wrapper and filter parameters
You can set some parameters in the tag to filter some information. The following example shows up to the latest 100 changes in the last 7 days in the main namespace (Pages):
<div class="rcinclude">{{Special:RecentChanges|limit=100|days=7|namespace=0}}</div>
To show changes in additional namespaces, add them to the namepace parameter, separated by a semi-colon:
<div class="rcinclude">{{Special:RecentChanges|limit=100|days=7|namespace=0;3010}}</div>
Format the output
After adding the <div class="rinclude">...</div> wrapper around your transclusion content, you can now use this rinclude class to style the output and to hide some unnecessary information. This class is important, because it ensures that other pages in the wiki, such as the actual "Recent changes" special page or the version history pages in your wiki are not affected by these changes.
To filter out additional detail information — such as change in file size, markers, or direct links to the version comparison —, add the following to the page MediaWiki:Common.css (admin rights required):
/** custom formatting for recent changes that are included on a wiki page with a div-wrapper of css-class .rcinclude **/

/* first style declaration hides all unnecessary info such as bytes, direct links to differences, links related to user, and markers */
.rcinclude .mw-changeslist-line-inner-userTalkLink,
.rcinclude .mw-diff-bytes,
.rcinclude .mw-tag-markers,
.rcinclude .mw-changeslist-legend,
.rcinclude .mw-changeslist-line-inner-rollback,
.rcinclude .mw-changeslist-links,
.rcinclude .mw-changeslist-separator,
.rcinclude.mw-rollback-link,
.rcinclude .mw-rollback-link {display:none}

/* remove the "New" indicator from the time in front of each entry - they can only be removed together */
.rcinclude td.mw-enhanced-rc {display:none}

/* increase spacing between entries */
.rcinclude .mw-changeslist-line {margin-bottom:0.6em}

/* separate page title and user name */
.rcinclude .mw-title::after {content:" -"}

/* make the day heading more compact */
.rcinclude .mw-changeslist h4 {font-size:0.95em; margin:1em 0 0.5em 0}

/* remove unnecessary space in the expanded version rows */
.rcinclude tr.mw-rcfilters-ui-highlights-enhanced-nested td:nth-child(3){display:none}

/** end recent changes formatting  **/
After saving these changes in MediaWiki:Common.css, you should now see the modified output of the transcluded content as shown in the previous screenshot.
If you still see the original formatting, you will need to clear the network cache:
- Right-click on the wiki page that contains the "Recent changes" transclusion.
- Click Inspect.
- Activate Disable cache
- Press F5 on your keyboard to refresh the page.


Discussions