WikiFarm is an architecture for BlueSpice wikis that can be used to centrally manage multiple wikis. Wikis can be created, cloned, deleted, and suspended. An administrative interface is provided for this purpose. The architecture also facilitates the maintenance of the wikis, since all wikis in the farm can be updated simultaneously.
Farm administration
Terminology
- WikiFarm: Central administration of all existing wikis.
- Root wiki: The wiki that is used as administration interface for all wiki instances.
- Wiki instance: A single wiki in the farm.
- Master wiki: A wiki that provides the content for pre-filling a new wiki. This wiki can be copied by cloning.
Access
The WikiFarm is implemented like a standalone and complete BlueSpice wiki and can be accessed at a certain URL. On the special page Special:SimpleFarmer you can access the farm management functions. In the list of all special pages (Special:SpecialPages) you can find the farm management in the section BlueSpice.

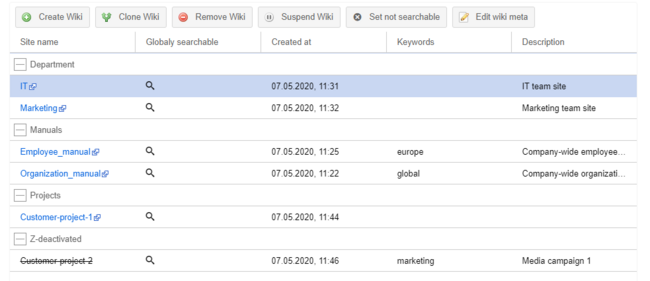
The farm management displays a complete list of all existing wiki instances with information about:
- Site name (links to the wiki)
- Globally searchable: Makes the wiki available to interwiki search between all wiki instances.
- Date of creation
- Keywords (meta information)
- Description (meta information)
The list is filterable and sortable.
Features
In the administrative interface you can:
- Create a wiki
- Clone a wiki
- Remove a wiki
- Suspend a wiki (archive)
- Exclude a wiki from interwiki search
- Add meta information for each wiki
Create a wiki
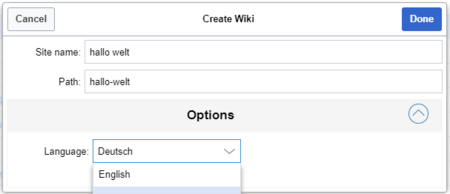
Using the button Create Wiki, you create a new wiki instance:
The individual wiki instances need a unique URL to make it accessible in the browser. This is automatically generated from the entered site name.
An example:
The WikiFarm is accessible at the URL https://wiki.bluespice.com.
While creating the wiki instance, the site name "hallo welt" has been chosen. Due to this, the following path - and therefore also the URL - of the new wiki instance will be generated:
https://wiki.bluespice.com/hallo-welt
Clone a wiki
To clone a wiki, you select an already created wiki as a source. Clicking on the list entry marks the selected wiki and activates the Clone Wiki button. In the dialog window, you can enter a site name and change the path (optional).
In contrast to creating a new wiki, content and data will already be transferred during the cloning process. All articles, users, settings, namespaces, etc. are copied to the new wiki. This is, therefore, a one-to-one copy of the source wiki. This makes it possible to create master wikis, pre-fill and easily duplicate them as needed.
Remove a wiki
Deleting a Wiki is easy: just select a wiki in the list, click on the button "Remove Wiki" and the corresponding dialogue will open. Only the path to the wiki needs to be entered here. This corresponds to the name of the wiki instance as it is listed in the farm manager. Enter this in the correct notation (delimiter, uppercase and lowercase) in the field and confirm with OK. The wiki will be deleted completely.
Suspend a wiki (archive)
If you do not want to delete a wiki directly, but want to keep the contents for a while, you can also suspend and therefore archive it. The shutdown causes that the wiki becomes unavailable. When trying to access it via the URL, you will be redirected to the farm management.
Suspended wiki instances remain in the list of the farm management, but they are crossed out and the site name no longer links to the instance.
Adding meta information
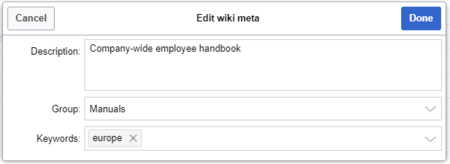
The individual wikis can be described with additional metadata using the button Edit wiki meta. The following meta information can be provided:
- Description
- Group
- Keywords
If there is any information from other wikis in group and keywords, this information can be selected in a drop-down menu.

Thedescription and the keywords will be displayed as additional information in the list of the farm manager. This makes them filterable and sortable. The group is different to these information, because it is just a grouping of the wikis in the list. The groups can be expanded and collapsed.
Creating new groups and keywords
Groups and keywords are created directly in the dialog window for entering meta information of a wiki instance.
- Group: If you need a new group for a wiki instance, enter the name in the text field and click Done.
- Keyword: If you want to create a new keyword, enter the keyword in the text field and finish it with a comma. Then click done.
Valid site names and paths
When creating and cloning a wiki, you can also use spaces or umlauts when entering the site name. Spaces are automatically converted to hyphens and umlauts according the right notation, e.g. "Ü" to "ue". Also upper and lower case is possible and is taken into account.
When removing a wiki instance, the system is not as tolerant. The input must match one-to-one with the path specification so that the wiki can be deleted.
Logs
All actions are stored in a logfile so that they can be tracked.
Authentication
In addition to standard authentication directly in the wiki, comfort sign-on is also possible. There are differences between an on-premise installations and the cloud:
| Type | On premise | Cloud |
|---|---|---|
| SAML | several identity providers possible | only 1 identity provider for all instances |
| OpenID Connect | different ID providers can be used
(centrally configurable) |
different ID providers can be used
(must be configured separately in each instance) |
| User session | shared user session possible | no shared user session, separate login to instances required |
Related info
