No edit summary |
No edit summary Tag: 2017 source edit |
||
| (12 intermediate revisions by 2 users not shown) | |||
| Line 29: | Line 29: | ||
## '''Enter''' a label. This is displayed as the label for the text field. | ## '''Enter''' a label. This is displayed as the label for the text field. | ||
## '''Add''' more form elements. | ## '''Add''' more form elements. | ||
# | # '''Click''' Submit at the bottom of the page to save the form. The form is now stored in the main namespace as ''EventChecklistHygiene.form''. [[File:Manual:Checklist-view.png|alt=Saved form|center|thumb|650x650px|Saved form]]<br />To continue editing the form, switch to the editing mode of the page (1). | ||
==Create a checklist instance== | ==Create a checklist instance== | ||
To use the form, create your first checklist. | To use the form, create your first checklist. | ||
# '''Open''' the page ''Special: | # '''Open''' the page ''Special:Edit_with_form''. | ||
# '''Choose''' the form ''EventChecklistHygiene''. | # '''Choose''' the form ''EventChecklistHygiene''. | ||
# '''Fill out''' the form fields. | # '''Fill out''' the form fields. | ||
# '''Click''' ''Submit''. | # '''Click''' ''Submit''.[[File:Manual:Checklist-create instance.png|alt=Create a checklist instance|center|thumb|650x650px|Create a checklist instance]] | ||
The checklist is now saved in the wiki and can be edited further. | The checklist is now saved in the wiki and can be edited further. | ||
# | ==Send email== | ||
The form can also send an Email after being saved: | |||
[[File:Manual:image.png|alt=Email target|center|thumb|650x650px|Email target]] | |||
*'''Target type:''' Email | |||
*'''Recipient:''' Possible recipients must have been configured on the server for security reasons. Example: | |||
<syntaxhighlight lang="text"> | |||
$wgFormsTargetEMailRecipients = [ | |||
'Marketing' => "marketing@example.com", | |||
'Administration' => 'WikiSysop' | |||
]; | |||
</syntaxhighlight> | |||
* '''Subject:''' Existing form fields can be used as variables here. The value is taken from the form. | |||
* '''Content:''' As in the subject, existing form fields can also be used as variables here. The value is taken from the form. | |||
[[mediawikiwiki:Help:Magic_words#Localisation|Localization messages]] in combination with form fields can also be used as subject or email body:<syntaxhighlight lang="text"> | |||
{{int:Mailsubject| {{{name}}}|{{{surname}}} }} | |||
</syntaxhighlight> | |||
==Adjust the styling== | ==Adjust the styling== | ||
| Line 54: | Line 73: | ||
To style the section heading: | To style the section heading: | ||
# '''Open''' the styling tab in the options menu of the Event heading field. | #'''Open''' the styling tab in the options menu of the Event heading field. | ||
# '''Add''' a new CSS class and enter a selector name (''CSS Classes'' field), e.g. ''frm-sectionhd''. | #'''Add''' a new CSS class and enter a selector name (''CSS Classes'' field), e.g. ''frm-sectionhd''.[[File:Manual:forms-css-class-en.png|alt=Add a css class|center|thumb|650x650px|Add a css class]] | ||
# '''Paste''' the following style declarations into the ''MediaWiki:Common.css'' page, e.g.:<syntaxhighlight lang="css"> | #'''Paste''' the following style declarations into the ''MediaWiki:Common.css'' page, e.g.:<syntaxhighlight lang="css"> | ||
border-bottom: 1px solid #a6a6a7; background:#f1f3f9; padding:6px;margin:30px 0; | border-bottom: 1px solid #a6a6a7; background:#f1f3f9; padding:6px;margin:30px 0; | ||
</syntaxhighlight> | </syntaxhighlight>[[File:Manual:forms-css-class-view-en.png|alt=Section label with customized styling|center|thumb|650x650px|Section label with customized styling]] | ||
If you do not have permission to view this page, you can enter style information directly for each element in the form via inline styling. | If you do not have permission to view this page, you can enter style information directly for each element in the form via inline styling. | ||
| Line 68: | Line 87: | ||
border-bottom: 1px solid #a6a6a7; background:#f1f3f9; padding:6px;margin:30px 0; | border-bottom: 1px solid #a6a6a7; background:#f1f3f9; padding:6px;margin:30px 0; | ||
</syntaxhighlight> | </syntaxhighlight> | ||
[[File:Manual:forms-css-inlinestyling-en.png|alt=Inline styling of a form element|center|thumb|650x650px|Inline styling of a form element]] | |||
{{translation}} | |||
Latest revision as of 13:45, 20 June 2025
The Forms extension allows formatting a wiki page or a user dialog as a form. It is also used in conjunction with the Workflows extension where it provides input forms for workflow data.
Introduction[edit | edit source]
To create a checklist as a form, for example, the following steps are necessary:
- Create and save the checklist form via the Special:Form_editor special page. The form serves as a template for all checklists that are created with it.
- Create and save checklist instances via the special page Special:Create_form_instance.
Optionally, the styling of the form can be adjusted.
As an example, we are creating a small checklist for an event where food-related hygiene information has to be tracked.
Create a checklist form[edit | edit source]
- Define the main properties of the form:
- Open the Special:Form editor page.
- Enter a name for the new form, e.g. EventChecklistHygiene. This name is used as a unique identifier for the database. Therefore, do not use any special characters (apart from the hyphen "-").
- Enter a title, e.g. Event Checklist. This is displayed as the display title instead of the form name if you activate the Display title checkbox.
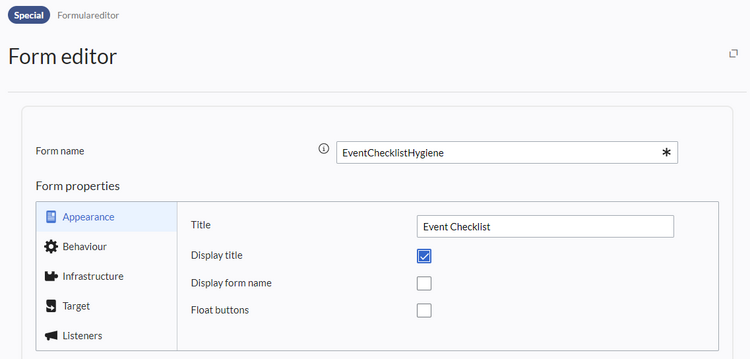
Form properties
- Add a form section:
- Select the Section label element under Form Elements > Other and, holding down the left mouse button, drag it into the interactive form editor field below.
- Click the section heading radio button. The editing dialog opens.
- Enter a field name. This is saved as a field ID in the database and should therefore not contain any special characters.
- Enter the title for the heading. This is used as the display title in the form.
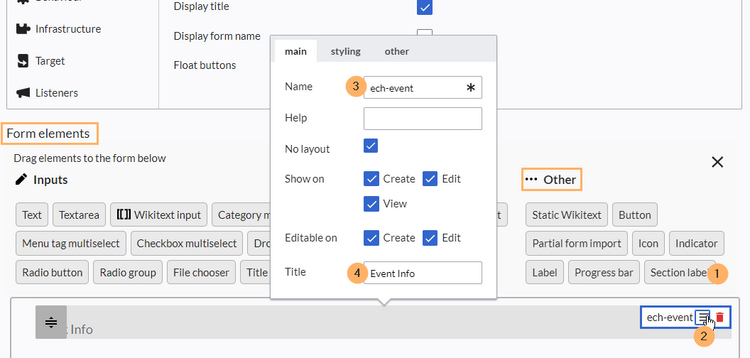
Create section label
- Create the form fields for the Event section. Here we add a text box as an example.
- Drag the Text element under the section heading while holding down the left mouse button.
- Click the text box radio button.
- Enter a name. This is used as the database ID for this field and should therefore not contain any special characters.
- Enter a label. This is displayed as the label for the text field.
- Add more form elements.
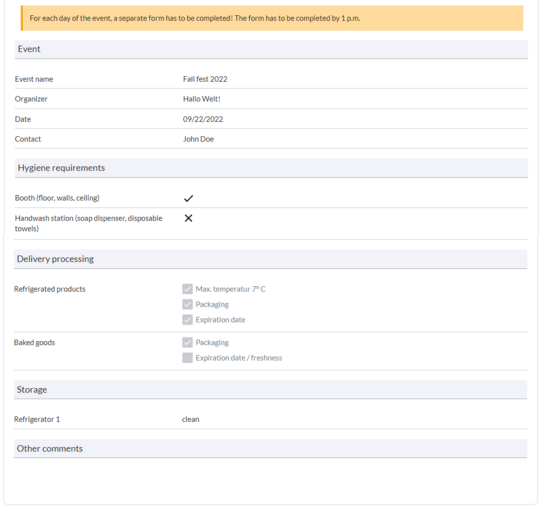
- Click Submit at the bottom of the page to save the form. The form is now stored in the main namespace as EventChecklistHygiene.form.
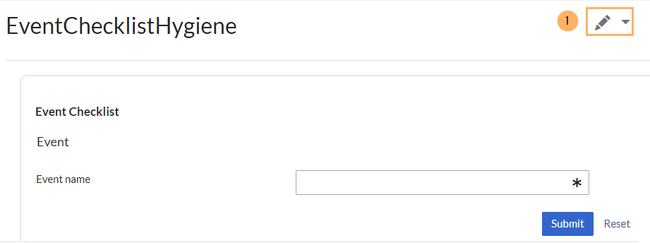
Saved form
To continue editing the form, switch to the editing mode of the page (1).
Create a checklist instance[edit | edit source]
To use the form, create your first checklist.
- Open the page Special:Edit_with_form.
- Choose the form EventChecklistHygiene.
- Fill out the form fields.
- Click Submit.
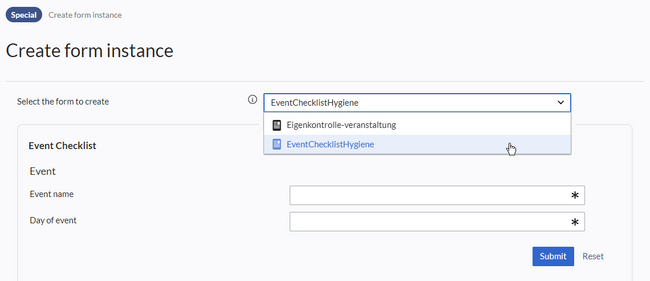
Create a checklist instance
The checklist is now saved in the wiki and can be edited further.
Send email[edit | edit source]
The form can also send an Email after being saved:
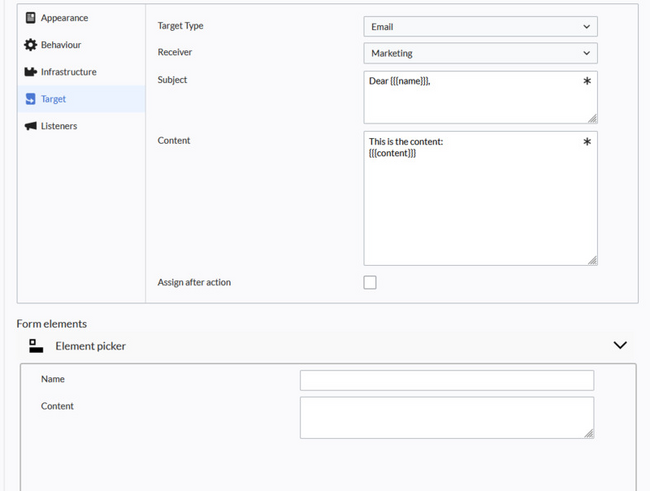
- Target type: Email
- Recipient: Possible recipients must have been configured on the server for security reasons. Example:
 $wgFormsTargetEMailRecipients = [

'Marketing' => "marketing@example.com",

'Administration' => 'WikiSysop'

];
- Subject: Existing form fields can be used as variables here. The value is taken from the form.
- Content: As in the subject, existing form fields can also be used as variables here. The value is taken from the form.
Localization messages in combination with form fields can also be used as subject or email body:
{{int:Mailsubject| {{{name}}}|{{{surname}}} }}
Adjust the styling[edit | edit source]
Common.css[edit | edit source]
To style individual elements in the form, go to the styling tab in the options dialog. There, you can enter a css class name. The styling is then defined on the MediaWiki:Common.css page (admin rights are required).
To style the section heading:
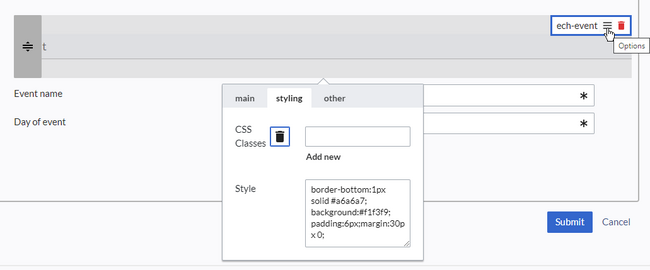
- Open the styling tab in the options menu of the Event heading field.
- Add a new CSS class and enter a selector name (CSS Classes field), e.g. frm-sectionhd.

Add a css class - Paste the following style declarations into the MediaWiki:Common.css page, e.g.:
border-bottom: 1px solid #a6a6a7; background:#f1f3f9; padding:6px;margin:30px 0;
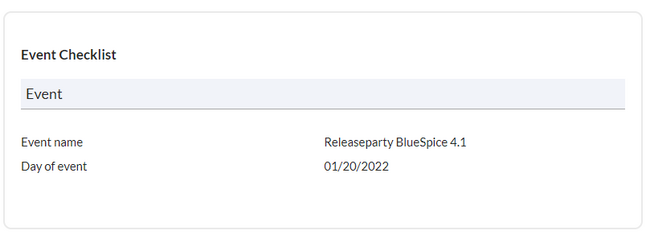
Section label with customized styling
If you do not have permission to view this page, you can enter style information directly for each element in the form via inline styling.
Inline styling[edit | edit source]
Without access to MediaWiki:Common.css, the style information can be entered directly in the form. However, with many recurring style declarations this is not efficient in contrast to the definition of CSS classes in MediaWiki:Common.css.
As an example, let's apply the previous section heading example directly as inline styling. To do this, open the options menu of the ech-event form element again. Enter the following statement in the Styling field and save the change:
border-bottom: 1px solid #a6a6a7; background:#f1f3f9; padding:6px;margin:30px 0;
