(Checklist item status changed) |
No edit summary Tag: 2017 source edit |
||
| Line 52: | Line 52: | ||
<bs:checkbox checked="true" /> Siziliana | <bs:checkbox checked="true" /> Siziliana | ||
</pre> | </pre> | ||
=== | ===Differences between checkboxes and task lists=== | ||
{| class="wikitable" | {| class="wikitable" | ||
|+ | |+ | ||
!Function | !Function | ||
! | !Checkbox | ||
(BlueSpiceChecklist) | (BlueSpiceChecklist) | ||
! | !Task list | ||
(Checklists) | (Checklists) | ||
|- | |- | ||
| Line 91: | Line 91: | ||
|} | |} | ||
<gallery widths="180" heights="120"> | <gallery widths="180" heights="120"> | ||
File:checkbox example.png|alt=2 checkboxes for selecting Margherita or Siziliana|Checkbox | |||
File:task example.png|alt=Completed task "Order a pizza" and open task "Pick up the pizza"|Tasks | |||
</gallery> | </gallery> | ||
| Line 104: | Line 104: | ||
<bs:checkbox checked="true" /> Siziliana | <bs:checkbox checked="true" /> Siziliana | ||
</syntaxhighlight> | </syntaxhighlight> | ||
{{Textbox|boxtype=important|header= | {{Textbox|boxtype=important|header=Important!|text=Checklists and checkboxes cannot be used on a page at the same time. | ||
If you use a checklist on a page, you can, however, create a [[Manual:Extension/SimpleTasks|task list]] as well.|icon=yes}} | |||
==Configuration== | ==Configuration== | ||
| Line 118: | Line 118: | ||
[[Category:Content]] | [[Category:Content]] | ||
== | ==Permissions== | ||
If a wiki page contains a checklist, any user with the c''hecklistmodify'' right can update the checklist values. This action occurs in view mode of the page. By default, these ar users in the roles ''editor, author, maintenanceadmin'' or ''bot'' | |||
==Magic word "checklist" (obsolete) {{Bsvs|bsvTo=4.2}}== | ==Magic word "checklist" (obsolete) {{Bsvs|bsvTo=4.2}}== | ||
| Line 144: | Line 143: | ||
# Under Selected option, choose the default value. | # Under Selected option, choose the default value. | ||
# '''Click''' Done. | # '''Click''' Done. | ||
{{translation}} | {{translation}} | ||
[[Category: | [[Category:Content]] | ||
Revision as of 15:16, 7 May 2024
Warning: Display title "Checklisten" overrides earlier display title "Checklists".
BlueSpiceChecklist allows you to insert a drop-down checklist or a checkbox. Users with edit rights can change the status or value directly in view mode.
Checklist
The checklist is inserted as a Content droplet. The selected list value can only be changed in the view mode of the page. This creates a new page version.

Defining list values
Die Listenwerte müssen vorab als Seite im Vorlagennamensraum definiert werden. Die Elemente müssen als ungeordnete Liste angelegt werden. Im Quelltext der Seite werden Listenpunkte mit einem * am Zeilenanfang erstellt.
Wenn Sie beispielsweise eine Liste von Pizzas erstellen möchten, in der eine bestimmte Pizza ausgewählt werden kann, können Sie die Seite Vorlage:Pizza mit folgendem Inhalt anlegen:
The list values must be predefined as a page in the namespace "Template" as an unordered list. In the source code of the page, list items are created with an asterisk * at the beginning of the line.
For example, if you want to create a list of pizzas from which a specific pizza can be selected, you can create a page alled Template:Pizza with the following content:
* Choose a pizza ...
* Margherita
* Schinken
* Salami
* Pilze
* Hawaii
* Gamberetti
* Diavolo
* Siziliana
* Quattro Formaggi
In addition, a font color (using HEX-code notation) can be specified for each entry:
* Quattro Formaggi | #00FF00
Inserting the list
The list can now be selected in the control list selection menu.

This generates the following tag in the source code:
<bs:checklist type="list" list="Template:Pizza" value="Choose a pizza..." />
Der parameter list legt die Seite fest, auf der sich die vordefinierte Liste befindet; value legt den Wert fest, der voreingestellt sein soll.
The parameter list specifies the page for the list values. The parameter value specifies the default value.
Checkboxes (source edit only)
In addition, it is possible to create individual checkboxes in source edit mode:
<bs:checkbox checked="false" /> Margherita
<bs:checkbox checked="true" /> Siziliana
Differences between checkboxes and task lists
| Function | Checkbox
(BlueSpiceChecklist) |
Task list
(Checklists) |
|---|---|---|
| Insert | in source edit mode |
|
| Selection | in view mode |
|
| Status | checkbox shows a check mark |
|
| Overview | no overview available |
|
| Edit permission | roles: editor, author, maintenanceadmin, bot | "edit" permission |
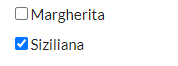
Checkbox
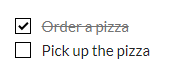
Tasks


Compatibility of checkboxes v4.3+
The Content Droplet Checklist is available from BlueSpice 4.3. Since this has changed the syntax, checkboxes that were previously created with the <bs:checklist /> tag must be adjusted accordingly. If there are many checkboes, this can be done using the page Special:ReplaceText.
The syntax <bs:checklist value="Salami" type="check" /> no longer works as of BlueSpice 4.3.
New integration:
<bs:checkbox checked="false" /> Margherita
<bs:checkbox checked="true" /> Siziliana
If you use a checklist on a page, you can, however, create a task list as well.
Configuration
The following configuration can be changed in the Config manager:
- Mark checklist changes as minor edit: If this setting is active, changes to a checklist (for example, checking a checkbox) in view mode are logged as minor edits. If this setting is inactive, a change to the checklist is recorded as a regular version in the page history.

Permissions
If a wiki page contains a checklist, any user with the checklistmodify right can update the checklist values. This action occurs in view mode of the page. By default, these ar users in the roles editor, author, maintenanceadmin or bot
Magic word "checklist" (obsolete) -v4.2
Until BlueSpice 4.2, checklist elements were inserted as magic word. To create a checklist item:
- Click Insert > More > Magic word in the visual editor.
- Click checklist in the dialog window.
- Click Done. Another dialog window appears.
- Select the tab to select your checklist type:
- Checkbox: creates an individual checkbox.
- List: creates a drop-down menu.

Creating a checkbox
- Toggle the switch in the dialog window on the checkbox tab to create an unselected checkbox. When this toggle is blue, the checkbox is pre-selected.
- Select insert. The checkbox is now visible on the page. Write the text for a label or for an instruction next to the checkbox
After the page has been saved, all users can activate and deactivate the checkbox.
Creating a drop-down list
- Select an existing option list in the List tab.
- Under Selected option, choose the default value.
- Click Done.
Discussions